
Contents
- 1 Ads-Free Knit Cable Baby Romper Pattern
- 2 Knitting materials and knitting tools:
- 3 Cable knit romper size:
- 4 Note for knitters:
- 5 Common abbreviations of knitting stitches:
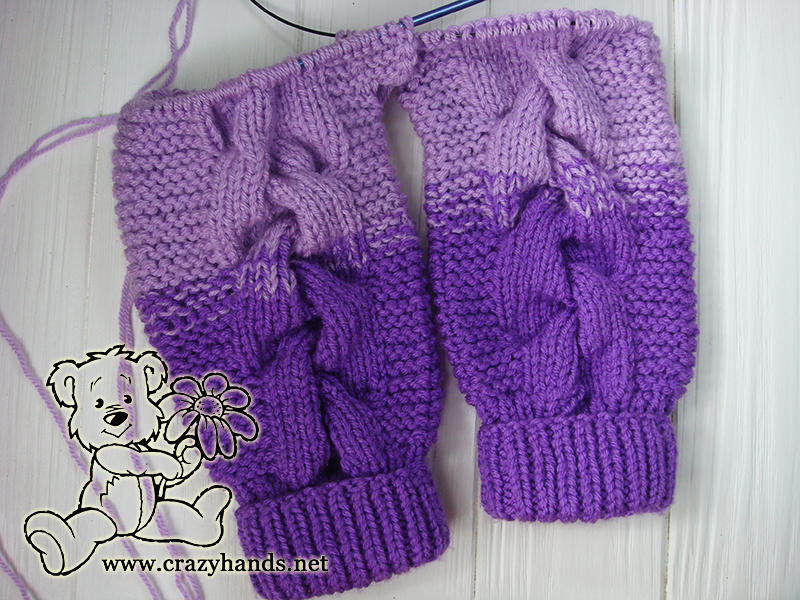
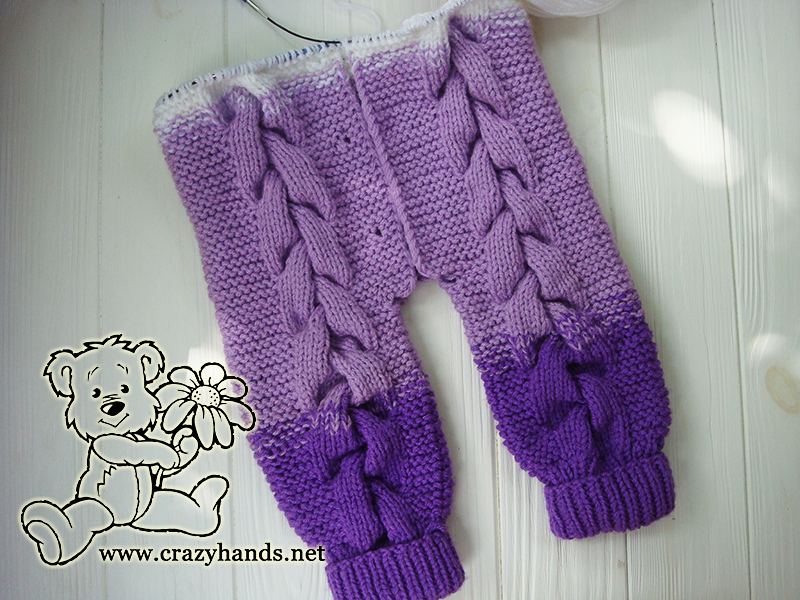
- 6 Right leg of the baby knit romper with cables:
- 7 Left leg of the baby knit cable romper:
- 8 Body of the baby knit cable romper:
- 9 Right front piece of the baby knit romper with cables:
- 10 Back piece of the baby knit cable romper:
- 11 Hood of the baby knit cable romper:
- 12 Sleeves of the baby knit cable romper:
Hi All,
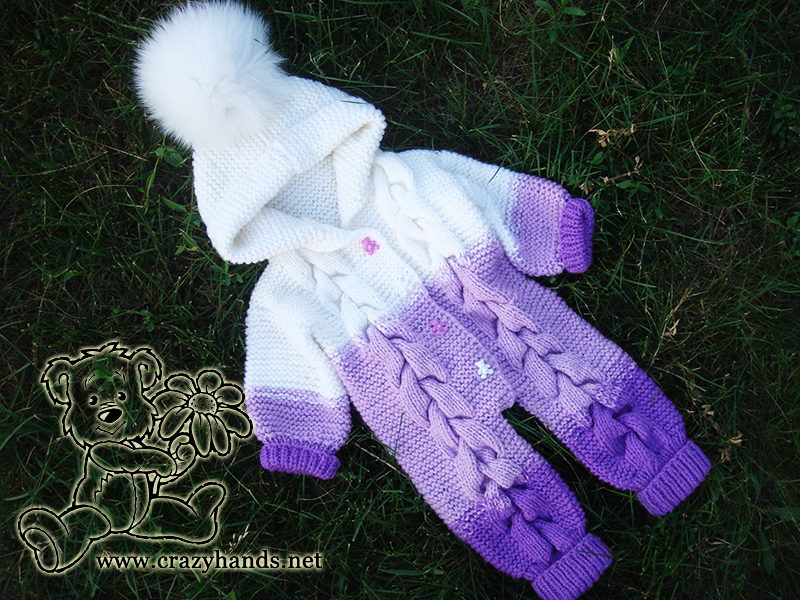
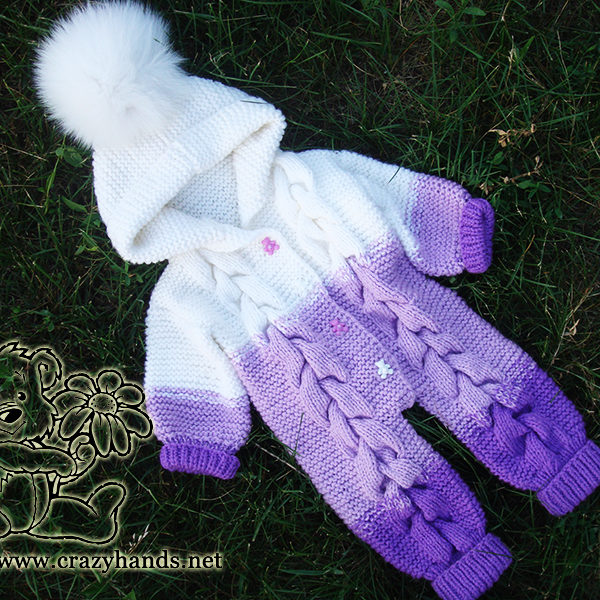
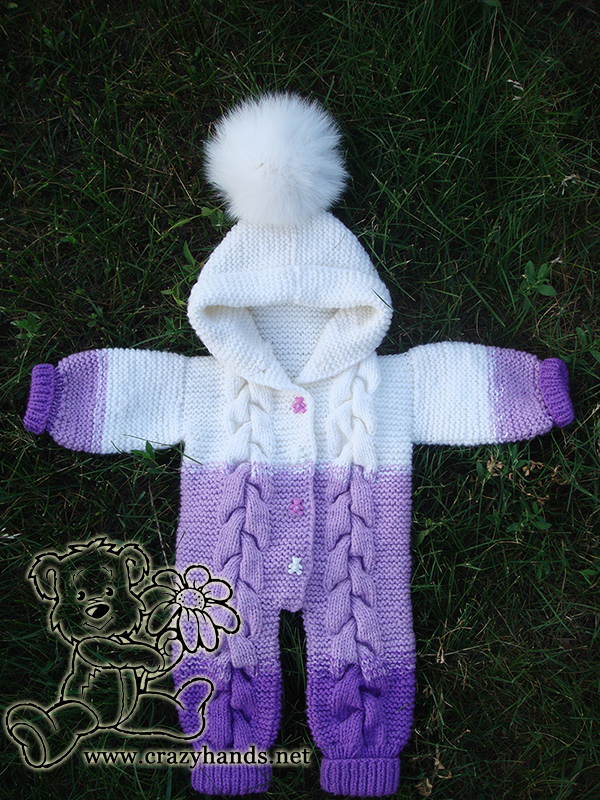
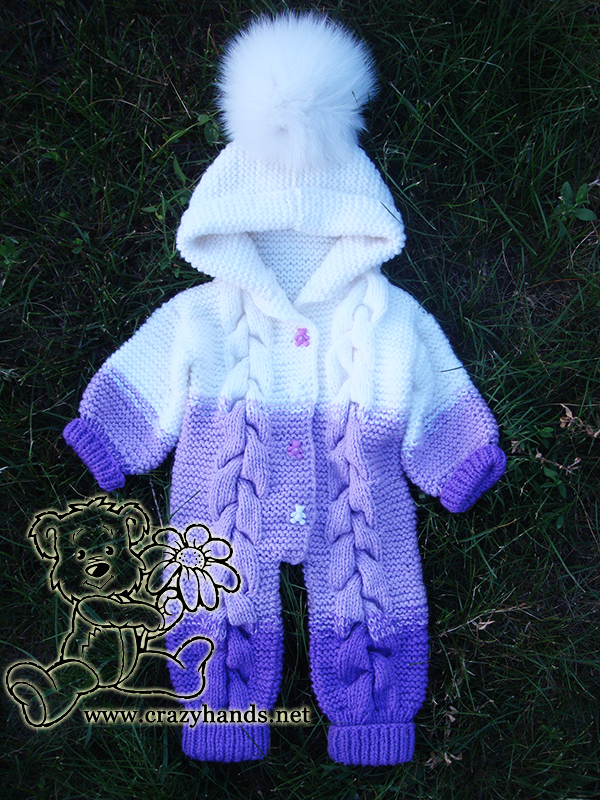
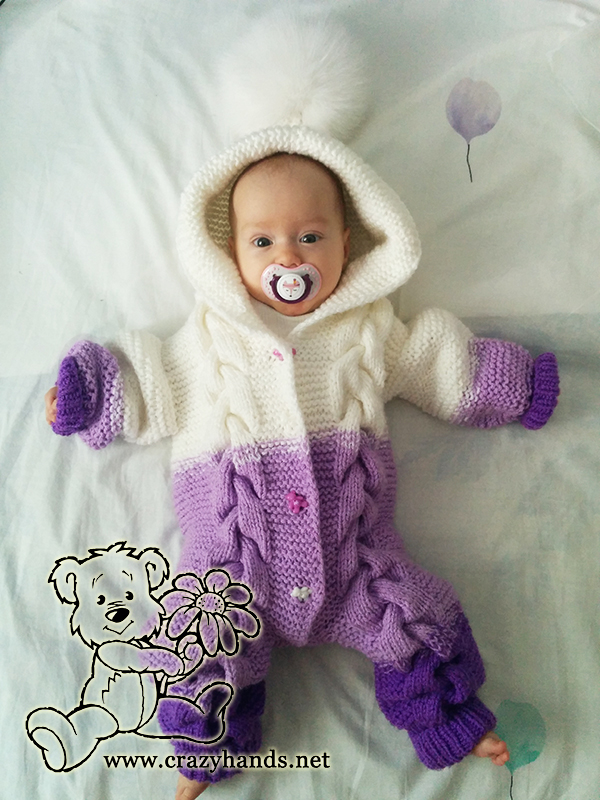
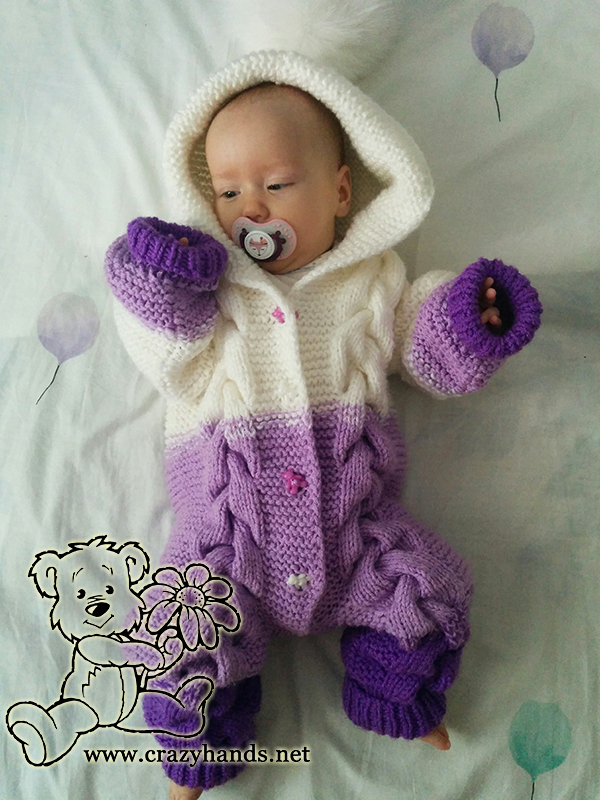
I’m happy to publish today a new project, baby knit romper pattern, I was working on for the past few weeks. I must confess that it ain’t an easy job to juggle around with a little baby, knitting, writing and doing some housework, but I was extremely satisfied with the knit romper I made for my girl, and photo session that followed later. My design of baby knit romper includes a gradient of purple, cool hood, and fluffy fur pom. Add your own touch to it and share your knitting project with me and your followers. Love you all and enjoy knitting 😉
Check out paid pattern for other sizes. Please note that paid pattern is more advanced as it has raglan line.
Knitting materials and knitting tools:
<> Circular needles in size 3.5 mm (US 4) for ribbing part and 4.5 mm (US 7/UK 7) for body part;
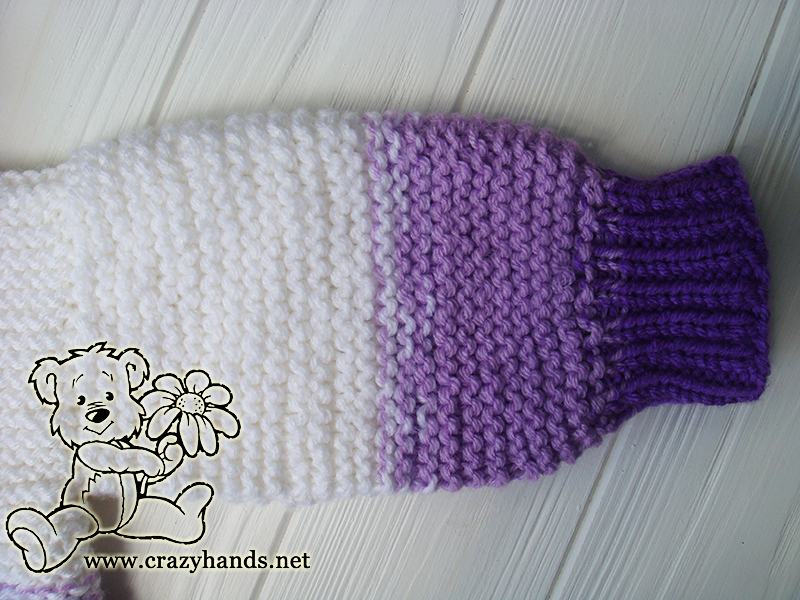
<> Kartopu Gonca – 100% acrylic – 100 grams = 300 m. (328 yds.) In total 6 balls of purple, violet and white colors.
<> White real fur pom pom for the hood or tail
Cable knit romper size:
Baby: 6-9 months
Gauge: 16 stitches = 4 inches in stockinette
Note for knitters:
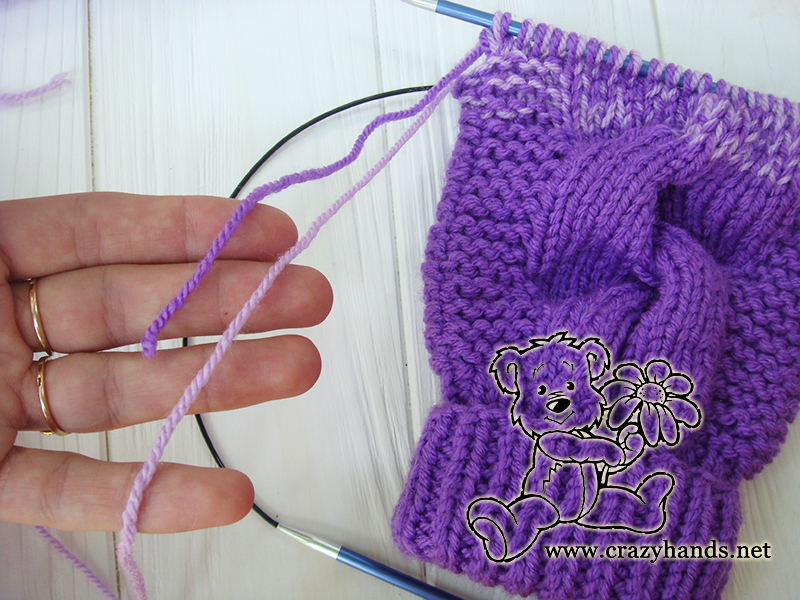
Knit with two strands of yarn at once.
Common abbreviations of knitting stitches:
k – knit
p – purl
k2tog – knit two together
p2tog – purl two together
sel s – selvage stitch – Always slip the first stitch, work to the last stitch, purl the last stitch
Cable 5 Back (C5B): Slip 5 knit stitches to the extra needle and hold in back of work, 5k from the left hand needle, 5k from the extra needle.
Cable 5 Front (C5F): Slip 5 knit stitches to the extra needle and hold in front of work, 5k from the left hand needle, 5k from the extra needle.
inc – increase
yo – yarn over
Right leg of the baby knit romper with cables:
Work in the round.
Using 3.5 mm circular needles cast on 40 stitches and rib k1, p1 until piece measures 9.5-10 cm (4 inches). Change needles to the larger size (4.5 mm).
Round 1: add 6 stitches – k4, inc, k6, inc, k4, inc, k10 inc, k6, inc, k4, inc k6.
Round 2: p4, k15, p27.
Round 3: knit all stitches.
Rounds 4 and 6: repeat Round 2.
Rounds 5 and 7: repeat Round 3.
Round 8: p4, C5F, k5, p27.
Round 9: knit all stitches.
Round 10: p4, k15, p27.
Rounds 11,13 and 15: repeat Round 9.
Rounds 12 and 14: repeat Round 10.
Round 16: p4, k5, C5B, p27.
Round 17: knit all stitches.
Rounds 18-24: repeat Rounds 2-8.
Round 25: knit all stitches.
Round 26: p4, k15, p27. At this point break one yarn of the purple color and add violet one.
Round 27: k22, inc, k2, inc, k22.
Round 28: p4, k15, p29.
Rounds 29 and 31: repeat Round 25.
Round 30: repeat Round 28.
Round 32: p4, k5, C5B, p29. At this point break another purple yarn and add new violet one.
Round 33: knit all stitches.
Round 34: p4, k15, p29.
Rounds 35, 37 and 39: repeat Round 33.
Rounds 36 and 38: repeat Rounds 34.
Round 40: p4, C5F, k5, p29.
Round 41: knit all stitches.
Round 42: p4, k15, p29.
Rounds 43, 45 and 47: repeat Round 41.
Rounds 44 and 46: repeat Rounds 42.
Round 48: p4, k5, C5B, p29. Break yarn leaving 10 cm tail.
Left leg of the baby knit cable romper:
Repeat ribbing part and Round 1 as for the right leg.
Round 2: p27, k15, p4.
Round 3: knit all stitches.
Rounds 4 and 6: repeat Round 2.
Rounds 5 and 7: repeat Round 3.
Round 8: p27, k5, C5B, p4.
Round 9: knit all stitches.
Round 10: p27, k15, p4.
Rounds 11,13 and 15: repeat Round 9.
Rounds 12 and 14: repeat Round 10.
Round 16: p27, C5F, k5, p4.
Round 17: knit all stitches.
Rounds 18-24: repeat Rounds 2-8.
Round 25: knit all stitches.
Round 26: p27, k15, p4. At this point break one yarn of the purple color and add violet one.
Round 27: k22, inc, k2, inc, k22.
Round 28: p29, k15, p4.
Rounds 29 and 31: repeat Round 25.
Round 30: repeat Round 28.
Round 32: p29, C5F, k5, p4. At this point break another purple yarn and add new violet one. Now you understand how to knit gradient. It does not matter where you are going to break the yarn, it is just a matter of taste. I was trying to get rid of acrylic yarn leftovers, so as soon as I was almost out of one color I broke the yarn and added new one.
Round 33: knit all stitches.
Round 34: p29, k15, p4.
Rounds 35, 37 and 39: repeat Round 33.
Rounds 36 and 38: repeat Rounds 34.
Round 40: p29, k5, C5B, p4.
Round 41: knit all stitches.
Round 42: p29, k15, p4.
Rounds 43, 45 and 47: repeat Round 41.
Rounds 44 and 46: repeat Rounds 42.
Round 48: p29, C5F, k5, p4. Break yarn leaving 10 cm tail.
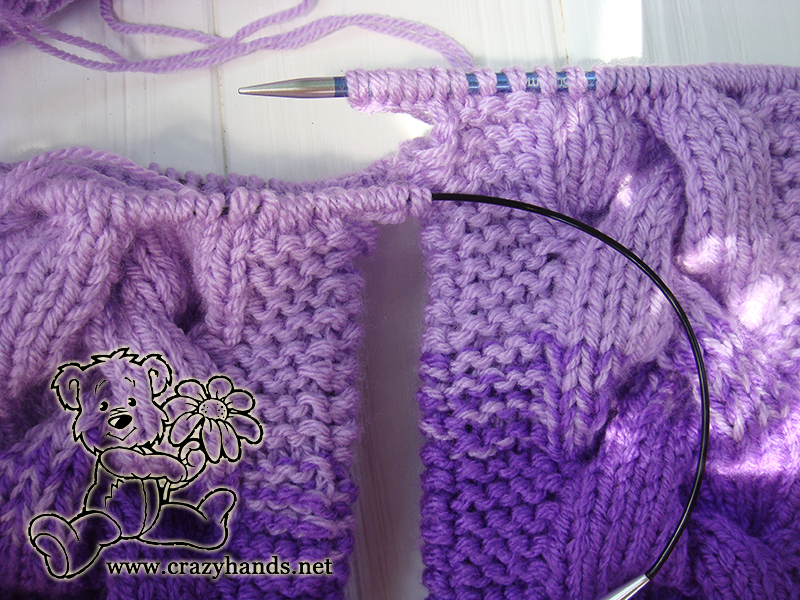
Body of the baby knit cable romper:
Work back and forth.
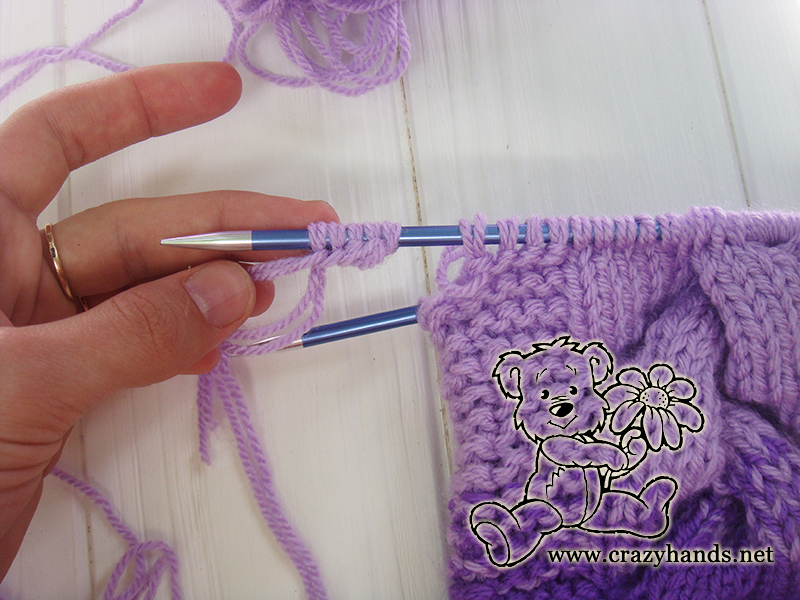
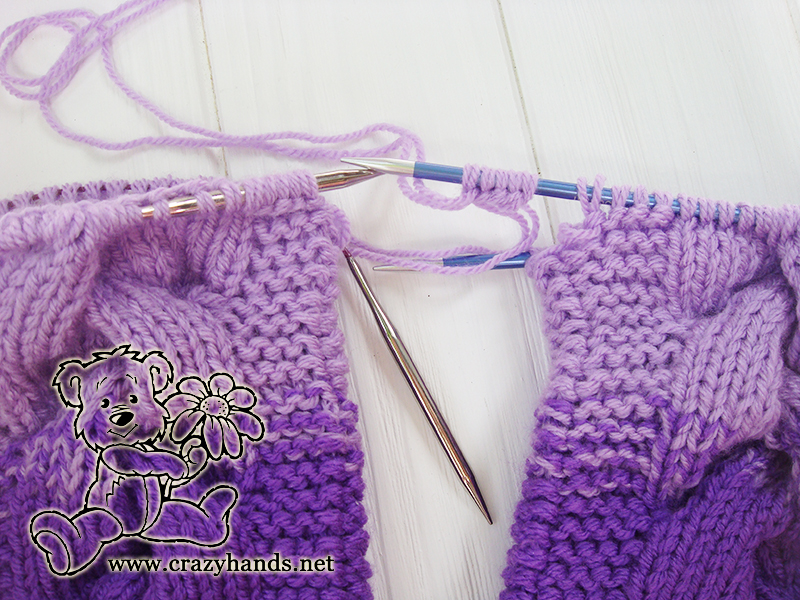
Row 1: Сast on 5 sts to the needle with the left leg, then knit all stitches of the right leg, cast on 5 more stitches and knit all stitches of the left leg, cast on 5 more stitches, turn.
Row 2: sel s, k8, p15, k63, p15, k8, sel s.

Row 3: knit all stitches. (Each row has salvage sts at the beginning and at the end)
Rows 4 and 6: Repeat Row 2.
Row 5: Repeat Row 3.
Row 7: sel s, k8, C5F, k73, C5B, k8, sel s.
Row 8: sel s, k8, p15, k63, p15, k8, sel s.
Row 9: knit all stitches.
Rows 10,12 and 14: Repeat Row 8.
Rows 11 and 13: Repeat Row 9.
Row 15: sel s, k13, C5B, k63, C5F, k13, sel s.
Row 16: sel s, k8, p15, k63, p15, k8, sel s.
Row 17: sel s, k3, (yo, k2tog – button hole), knit all other stitches.
Row 18: sel s, k8, p15, k63, p15, k8, sel s.
Row 19: knit all stitches.
Rows 20 and 22: Repeat Row 18.
Rows 21: Repeat Row 19.
Row 23: Repeat Row 7.
Row 24: Repeat Row 8.
Repeat Rows 9-16 and then 17-24 twice. Skip doing button hole in the Row 17 and knit it in a way to have about 6-7 cm between each.
Work front and back pieces separately. Each left front piece and right front piece has 34 stitches.
Right front piece of the baby knit romper with cables:
!!! Don’t forget to knit button holes!!!
Row 1: knit all stitches, turn. (Each row has salvage sts)
Row 2: sel s, k9, p15, k8 sel s.
Rows 3 and 5: Repeat Row 1.
Rows 4 and 6: Repeat Row 2.
Row 7: sel s, k8, C5F, k14, sel s.
Row 8: sel s, k9, p15, k8 sel s.
Row 9: knit all stitches, turn.
Row 10: sel s, k9, p15, k8, sel s.
Row 11: knit all stitches, turn.
Rows 12 and 14: Repeat Row 10.
Row 13: Repeat Row 11.
Row 15: sel s, k13, C5B, k9, sel s.
Row 16: sel s, k9, p15, k8, sel s.
Repeat Rows 1-16 one more time. Again, don’t forget about button holes.
Knit left front piece in the same manner. Pay attention to the cable pattern: in the Row 7 you will knit C5B and in the Row 15 – C5F.
Back piece of the baby knit cable romper:
Work 32 rows in garter stitch.
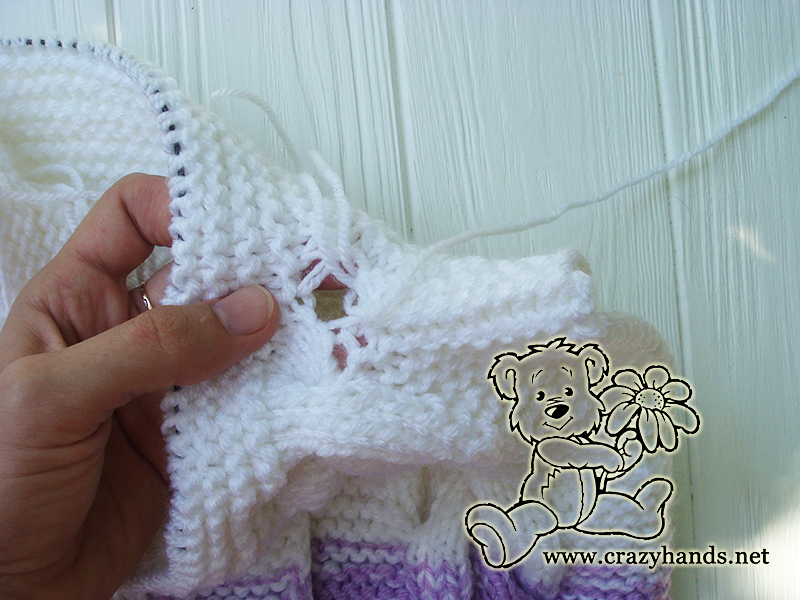
Using grafting/kitchener stitch sew 10 stitches of right and left overarm seam. Check my short Instagram video if you don’t know how to do it.
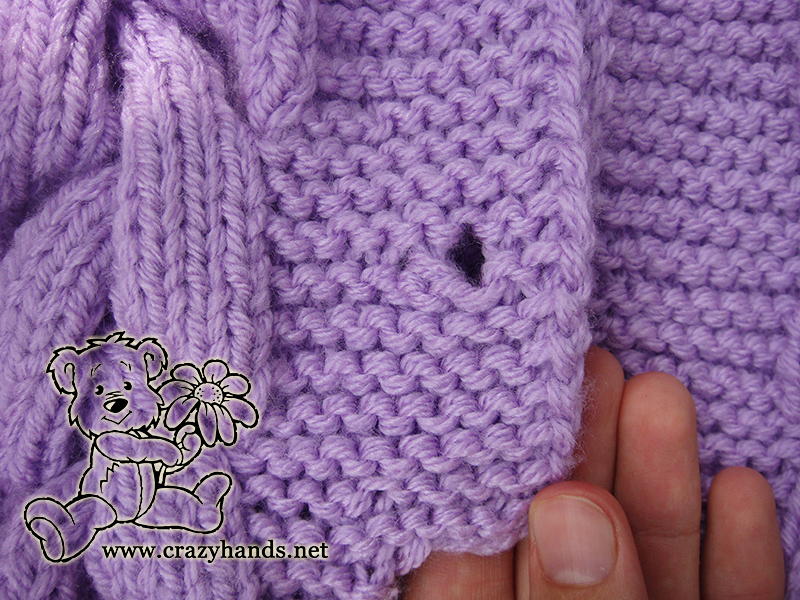
Slip all other stitches to one circular needles. Don’t worry if you see some holes near the neck, you can stitch them up later.
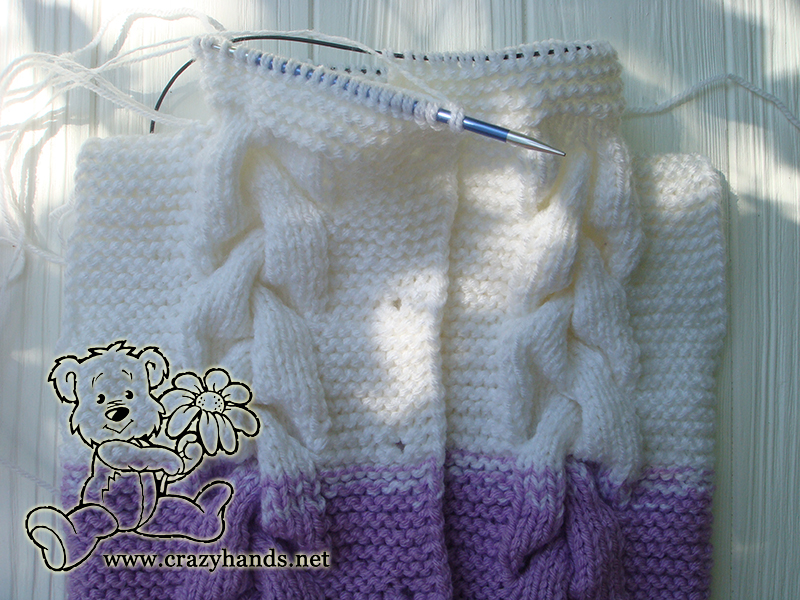
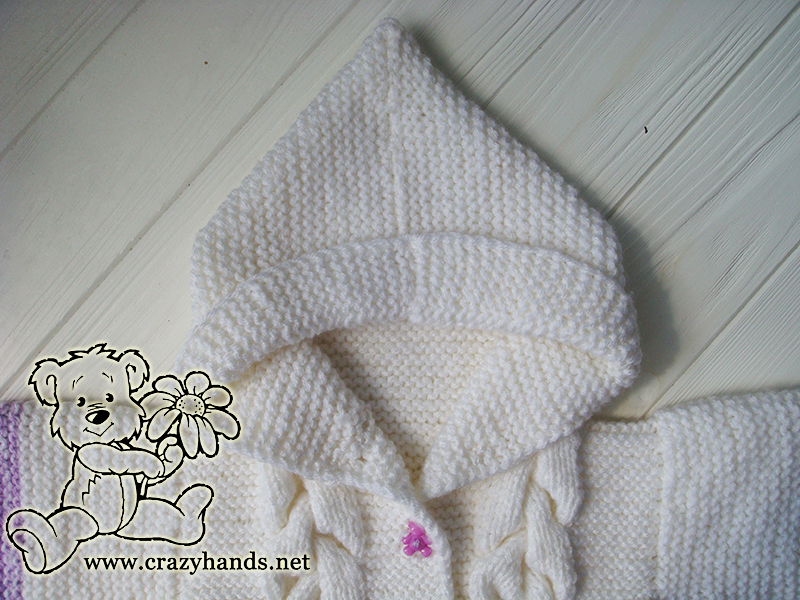
Hood of the baby knit cable romper:
Work in garter stitch until piece measures 23-25 cm (9-10 inches). Fold hood in half and sew it at the top with grafting/kitchener stitch as well.
Sleeves of the baby knit cable romper:
Make two. Work in the round.
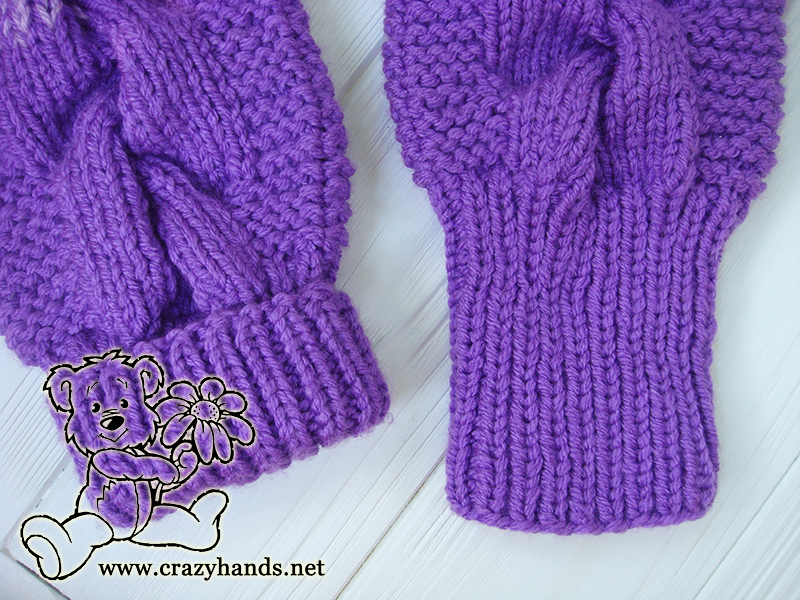
Pick up 40 stitches around the armhole. Work in garter stitch until the ribbing part. In the round before ribbing part make 6 decreases. Now you have 34 sts on the needles. Change needles to the smaller size and work rib k1, p1.
Binding off: k1, p1 pass stitch over, *k1 pass stitch over, p1 pass stitch over, repeat from * till the end of the round.
Sew on buttons and stitch up place between the legs as shown on the picture.
If you want to make a real bear, add ears to the hood. I thought it would be too much ears if your matching hat already has them. Instead, I attached big fur pom pom to the hood and to the tail’s place. Find detailed instruction of how to make knit bear’s ears here.
Check out a matching Doll Cable Knit Romper Pattern.
Thank you for visiting my site, you are my steady doze of inspiration.
139 comments
I can’t find where to change to the white colour
Hi. It is up to you where do you want to change it. I was trying to get rid of acrylic yarn leftovers, so as soon as I finished one color I added another.
Hi
This is a very cute pattern, thanks for sharing. I completed the 2 legs but it turns out that the left leg is actually the right left and vice versa. How can I continue the pattern? Thanks in advance for your response
Hi. I am not sure what you are talking about. Just go on with pattern and make correct cable twists where needed. Dont not matter where is right and where is left just pay attention to twists ( right or left leaning_
Thanks for your response 😀
Hi please could you advise how I would change this to a new born pattern?
Hi Antonia,
You can simply take lighter yarn and smaller size knitting needles, I am sure it will work.
I love this. I hope to try it soon! Thank you so much for all the great new patterns to try! May you be blessed with all the best!
Thank you for your kind words. Please enjoy knitting romper
Can I make this with just 4mm circular needles?for 0 to 3 months?
hi, yes sure you can. But if you stuck somewhere I am already writing pattern for all sizes that will be available within next couple of weeks.
Hello! I’m due with my baby in several weeks and really want to use your pattern for a December newborn size. Have you finished writing a pattern for a newborn? I saw you mentioned doing that in the comments. Also, do you have any videos of yourself working the different tricky sections? I’m a newbie but really want to attempt and complete this. Please advise! Thanks so much!
-Stephanie
Hi Stephanie. I see you have bought already a pattern. It is a bit harder than the free version as I explain how to knit a raglan. Please, do not hesitate to ask me questions, I will be happy to help you and if you need will add extra helpful video for you. Look forward to seeing your knit romper 🙂
Hi! Thanks so much for your response. I sent an email but not sure if I found your correct email. I’m wondering if you could send me some videos of the tricky parts of the 0-3 month pattern, as I’m having a tough time reading and understanding several different parts. Appreciate your help and looking forward to making this!
-Stephanie
Hi Stephanie! Do you mind sharing which parts you have a tough time with and I’ll do my best to help you out. I’ll shoot you an email in a moment and we can move the thread there.
Hi,
I love the onesie but the pattern is very unclear in places, “Repeat Rows 9-16 and then 17-24 twice. Skip doing button hole in the Row 17 and knit it in a way to have about 6-7 cm between each” am i meant to knit 9-16 once, and then 17-34 twice or both 9-16 twice and 17-24 twice? Also which row 17 button hole do i skip? the first? the second? Both? Because ive done 9-16 once and i have about 7cm from the edge to the first button hole already, but it doesnt make sense to repeat 17-24 twice here if im putting the button hole there, because surely that will mess up the spacing on the next portion. Im also lost on the next portion, it doesnt say where to put the button holes on the “Right front piece of the baby knit romper with cables”.
Thank you.
Hi. Sorry to confuse you. Repeat rounds 9-24 twice. Regarding button holes i showed only the first one and how i knit it. All other button holes you are doing by yourself. I just recommend the distance between each. You might want more button holes than I did. Therefore i kindly remind you in the pattern to not forget about buttons wholes as there is no description for it after. Let me know if it helped.
Hi,
thank you for the quick reply! This clears it up nicely thank you very much, i cant wait to finish, its going to look so cute on my niece!
Hi! Thankyou for sharing this beautiful pattern. I am going to make it for my 1st great grandbaby who arrives in April. How many balls of each colour does the pattern use? I will need to order it online since it is not available where l live. Thankyou!
Hi. My congratulations. I gave birth in April last year as well, so this size will be perfect for cold season. In total you will need about 6 balls or 600 grams. Let me know if you have other questions.
To knit this romper in solid color do I need 600 grams . Thank you
It depends on your gauge Bunny
Love this pattern but does not say what length of cable should be used.
Sorry Bunny what do you mean by length here?
Hi… im a beginner and im not really understanding how to do the row 8… Can you please explain the C5F and C5B?? I really want to make this cute romper… Im expecting in December… Thank you
Hi Awfee, I hope you are doing well. I know you have hard but at the same wonderful time with your growing baby. Please check my Youtube channel ( in this video starting from 5th min) I am showing how to do C4B and C4F. Do the same but only slip 5 stitches instead of 4. Also check this tutorial to find more pics https://crazyhands.net/chunky-knit-cable-ear-warmer-pattern/ Let me know if you have other questions
Hi, I am following your pattern for this onesie and mine appears to be different. The cables are not centered, they are toward the left side, 4 stitches in; and in your picture, it looks like you used a stockinette stitch for the cables and the rest was knit stitch. Am I doing something wrong?
Hi. Did you see that the left and the right leg has different pattern. You are also right I have used stockinette stitch for cables and garter stitch knitted in the round for the other part. Let me know if you have other questions
I’m on the sleeve…it doesn’t say how many inches to the ribbing. Thank you for sharing the pattern, it’s really cute!
Hi. You do not start from the ribbing part, you need to pick up 40 stitches around the armhole. Let me know if it clear
yes, I did that but the pattern doesn’t say how many inches to work until you get to he ribbing…
use the picture with measurement that I post in the top of the pattern. It is 16-17 cm
Great, thank you
I’m at the sleeve but it doesn’t say how many inches to the ribbing. Thank you for sharing the pattern, t’s really cute.
Hi. You do not start from the ribbing part, you need to pick up 40 stitches around the armhole.
I am trying to make this but the writtin pattern is not the same as picture I can see that were the cable is should be a knit but it comes out as purl i am very confused with this pattern. thank you Maria
Hi. Did not actually understand your problem. If you knit in the round you always knit cable stitches and alternate knit and purl stitches for the other part. For example one round you knit all stitches and other round you knit only cable and purl other part. I hope it is clear
Hi. I became a grandma I December ( greatest Christmas gift ever) and I want to knit this romper for the baby. But he will be one year old this winter, so I have enough time to make mistakes 😁. But my question is, how do I make it to fit him ? How many more stitches do I have to add ? I know that is has to be longer, so that is covered by buying a romper for a one year old. But the amount of extra stitches is my question. 😊. Thank you.
Hi Paulina. First of all my congratulations with your grandchild 🙂 God blessed your family. May the baby stay healthy and happy. Regarding the pattern for one year old it will be easy to adjust if you know your gauge and have a baby romper. In case if you have the same gauge as me, cast on 44 sts for the leg and follow the pattern keeping in mind the length (make 8 increases if 6 is not enough). Same for the sleeve, cast on 44 sts. Otherwise you can knit the swatch, check your gauge and recalculate it. Let me know if you have other questions and hope to see your romper soon in FB or Instagram. Ann
Hi. I became a grandma I December ( greatest Christmas gift ever) and I want to knit this romper for the baby. But he will be one year old this winter, so I have enough time to make mistakes 😁. But my question is, how do I make it to fit him ? How many more stitches do I have to add ? I know that is has to be longer, so that is covered by buying a romper for a one year old. But the amount of extra stitches is my question. 😊. Thank you..
Hi Paulina. First of all my congratulations with your grandchild 🙂 God blessed your family. May the baby stay healthy and happy. Regarding the pattern for one year old it will be easy to adjust if you know your gauge and have a baby romper. In case if you have the same gauge as me, cast on 44 sts for the leg and follow the pattern keeping in mind the length (make 8 increases if 6 is not enough). Same for the sleeve, cast on 44 sts. Otherwise you can knit the swatch, check your gauge and recalculate it. Let me know if you have other questions and hope to see your romper soon in FB or Instagram. Ann
Hello. This is gorgeous. I want to knit it for !y grandson. But he is one year old. How do I do it ? Do I knit with bigger needel ? Or do I increase the amount of stitches ? If that is the case , how many ?
Hi Ana. I have just answered Paulina for the same question. Please read it. And you are right you can take bigger needles and heavier yarn and follow the pattern. One suggestion take soft and possible merino wool yarn to knit baby romper.
Love your pattern and am going to try it but I’m British and am not sure what it means by sel s could you help is this slip edge stitch
Hi. Yes, you are right. That is what i mean
Hi Sally I am answered already your q before. You are right
Hi 😀
Thanks for sharing this beautiful pattern. Now I’m 23 weeks pregnant and knitting for my baby.
I have little question here. I think 7th and 15th row of right front should be changed (knit 7th as a 15th and knit 15th as a 7th). Because when I follow written pattern my last 2 cables are on the same side. Am I right? Or am I doing something wrong?
Hi Battuul. First of all my congratulations. I wish you give birth a healthy and beautiful baby. Regarding the pattern you can actually knit as you said, but what I did I wanted the cable to be symmetrically viewed if you understand what i mean. Hope to see your romper soon.
A beautiful pattern. However, I don’t llike using circular needles – do you have the pattern for straight needles please? Or can you tell me how to adjust it myself. Thank you.
Hi Carolyn. To knit on straight needles you have to add 2 extra stitches and knit them as salvage sts. For the garter stitch pattern on straight needles you use only knit stitches but for the cable you alternate knit in one row and purl in other. If you have questions, please ask
A beautiful pattern. However, I don’t llike using circular needles – do you have the pattern for straight needles please?
Thank you.
Hi Carolyn. To knit on straight needles you have to add 2 extra stitches and knit them as salvage sts. For the garter stitch pattern on straight needles you use only knit stitches but for the cable you alternate knit in one row and purl in other. If you have questions, please ask
Hi just wondering if you could make this on two needles rather than circular
Hi, yes you can. I have explained it for Carolyn in the comments above
Hi. I am having some problems with the cable part of the pattern. When I arrive at row 8 it says P4,C5F,K5,P27. I know you have given the instructions for C5F and C5B but do you actually knit the 5 stitches before sliding them onto the spare needle as it says K5, or is it P4 then slip next 5 stitches onto spare needle, knit 5 from left hand needle then knit the 5 stitches from the spare needle ? Also as someone has asked before … the cable seems to be ending up as a garter stitch and not a stockinette stitch. Sorry but haven’t done any knitting for years ! Thanks.
Hi. Sorry for my late respond. If you are talking exactly about Row 8 then you p4, slip next 5 stitches, k5 from the left hand needle, knit 5 from the spare needle, k5, p27. Regarding the second questions if you knit in the round you always use knit stitches for the cable part and for the other part you alternate- one round knit stitches, other round purl stitches. Let me know if it is clear
Hello loving the pattern! I have a quick question, do I have to double the yarn?? Could I just knit it with a single Dk and it would just come up thinner?? Or would it be too thin?
Hi. Yeah you can knit with single DK but it might be thinner. Knit small swatch to check your gauge before. If it same as mine then go ahead!
Love this pattern but does not say what length of cable should be used.
Sorry Bunny what do you mean by length here?
Hello me again 🙂 I’m confused with the pattern. Iv knit the left leg and the right leg and now Iv come to join them together and I don’t understand. I add 5 stitches to the left leg then knit all the right leg stitches, does this mean literally all of them or just the ones on the front needle?? Then do I add 5 more and then to knit the ones on the left leg?? I’m so confused
Hi Victoria. You are right. Literally as you said all stitches of the right leg then add 5 stitches and knit all stitches of the leg. You are right!
I read that a 40 inch cable works for any knitting projects. I had no problem with the pattern but now I’m having a difficult time trying to join the right & left leg. I have frogged it 4 times. The illustration looks easy but I am having a hard time with it. I guess I’ll just have to keep trying. I just read that Victoria is having the same problem Thanks. Bunny
I think I understand. I add 5 stitches to the left leg then knit all stitches on right leg, at end of row I add another 5 stitches to the back of the right leg,, then add 5 stitches to the back of the left leg. This is where I get confused where do I add on 5 stitches to the right leg.
I’m just as confused as Victoria. Do I add 5 stitches to the front and back of each leg
Hi Bunny! How is it going with your romper. You have right leg and left leg. Take new yarn and cast on 5 sts to the needle with the left leg (check pictute plz), then knit all stitches of the right leg, cast on 5 more stitches and knit all stitches of the left leg, cast on 5 more stitches, turn. Like this you join all parts together. I dunno if i helped. You cast on 5 sts 3 times.
I did it thanks to you. I’m now working on the sleeves, so far so good, Thanks for checking up on the problem I was having which turned out to be the easiest part of the pattern. Thanks again. Bunny
Hi there!
I’m having some issues as well trying to knit together the two legs. What size circular needles should I use? As I knit the stitches on I can’t seem to round the bend (if that makes sense) of the leg because the wool is stretching!
Is there anyway to knit this ok four needles. I’m not very skilled with circular needles.
Hi Sharon. For the legs part I was using 4.5 mm needles(for the cable part). Of course you can use DPN, just use the mentioned size. Did you read my other comments? Take a new ball of yarn and cast on 5 sts to the needle with the left leg, then knit all stitches of the right leg, cast on 5 more stitches and knit all stitches of the left leg, cast on 5 more stitches, turn.
Please let me know where is your problem.
4
Hi! I love this pattern. I’m ready to work the individual front pieces and back. Do I put them on a stitch holder? Not sure how to work those sections individually.
Thank you
Hi Carol. Yes you are right, you put that parts on a stitch holder.
Hi, I get lost when joining legs. After inc 5 sts 3x, how many sts total should be on the needle to work after I turn?
Hi 111 stitches. 48 sts – each leg, and 15 sts that you added. 48+48 +5+5+5=111 sts. Let me know where have you stopped
Thank you for getting back so quickly. I stoppped when it didnt look right. I continued in the round and back and forth cables were off when attaching the legs to body. I just pulled off the attached yarn and now, painstakingly putting the sts back on the needle and counting.
So, do I go across the right leg and continue in round or turn and reverse direction? That’s where I got lost.
Hi Inez. Now you knit back and forth or as you said turn and reverse direction. Hope it is more clear now. I am by the way working on other sizes up to 12 months. Hope to write the pattern soon
Lol..thanks again. Being self taught some of the terminology of knitting is new to me. Definitely see a difference between the UK and American. I intend to meet this challenge. Yay! I completed 24 rows. Now, do I repeat rows 9- 16 twice as well as 17-24?
Hi. Yeah, exactly, repeat those rows and dont forget about button holes
Thanks again! How do I send you a pic of fininshed work?
I have Instagram page @amurushka_amur or Fb group https://www.facebook.com/crazyhands.net/. I am looking forward sharing your romper with others 🙂 Thank you
Thank you for getting back so quickly. I continued in the round and back and forth cables were off when attaching the legs to body. I just pulled off the attached yarn and now, painstakingly putting the sts back on the needle. Lost on whether to turn or continue in the round.
Thank you for getting back so quickly. I stoppped when it didnt look right. I continued in the round and back and forth cables were off when attaching the legs to body. I just pulled off the attached yarn and now, painstakingly putting the sts back on the needle. Lost on whether to turn or continue in the round.
Thank you for getting back so quickly. I continued in the round and back and forth cables were off when attaching the legs to body. I just pulled off the attached yarn and now, painstakingly putting the sts back on the needle. Lost on whether to turn or continue in the round.
I have joined the legs to do the body. Is this part correct. I have completed row 4, 5 and 6. Row 7 and 8 normally have a knit row between and don’t . Is there a reason or that
Rows 4 and 6: Repeat Row 2.
Row 5: Repeat Row 3.
Row 7: sel s, k8, C5F, k73, C5B, k8, sel s.
Row 8: sel s, k8, p15, k63, p15, k8, sel s.
Row 9: knit all stitches.
Hi Colleen, everything is all right from what you have written above. As you have started knitting back and forth and not in the round, now you are going to have only knit stitches between cables. Did I answer your question, please let me know
Maybe I didn’t explain right – usually row 7 would be the same as row 9 . I will call the rows K and C(cable)
It was an 8 row pattern
k, c, k, c, k, c, k, c now you have it as k,c,k,c,k,c,c,c
Is that clearer
Hi Colleen, I see now. As we started knitting back and forth we have to make cable twist one row earlier, otherwise twist will be on the wrong side of the romper that is incorrect. All other cable twists will be done as usually. Is it ok now?
I just finish knitting one for my grandson. Thank you very much for the pattern.
Happy to hear it Merlene, I am sure your grandson will look cute and lovely in your romper:)
Thank you so very much for the lovely pattern and all the work you have put in answering everyone’s questions! Bless you. I hope to make one for my gbaby due in June, that will be winter here in Australia
Thank you for your kind feedback, I have added link to your previous comment
Hi Colleen, I’m trying to,print this pattern but looking on the preprint I have a plaid pattern on the left side and not what I see here . Do,you have any explanation for this !
Thank you so much Have a nice day and stay healthy .
Dorle
Hi Dorle. You can only buy ads free patterns. Otherwise the romper is free online on my blog. Thanks for understanding
Sorry I called you Colleen ….my mistake
Can you tell me what length circular needles are needed, I can’t find it said anywhere
Hi. I was using 80 cm
When changing from the front right piece to the left hand side do I need to use a new yarn? Can’t see how else I would do this? Thanks
Hi, yes you are right, use new yarn
Thankyou, last question, how long do I make the arms? And do you have a pattern for bunny ears?
Length can be found on the picture in the section Cable knit romper size. I dont have bunny ears pattern, but it is easy to make, just cast on (or pick up) desired number of sts, knit until piece reaches 15-20 cm, and make decreases from both side until you have 2 or 4 sts on your needles, cut the yarn and pull through remaining sts. Hope it helps
How long should the sleeves be?
Thanks
check the chart please
Knitting Guru, I have knitted the first leg of the pattern but my cables are on the inside of my circular needle. Is this going to be a problem.?
Hi, you can turn the leg right side out. I just wonder how your cable looks? in stockinette stitch?
Thanks for your answer so quickly. The cable looks good.
Let me know if you need my help
Me again. Sorry. But I am knitting body of the romper and nearing the do rows 17-24 twice,. I am still knitting on circular needles, but not joined in the front, only back. Then the pattern says work front and back pieces separately. Is there a way to correct this?
Hi Marianne, not sure what you are asking about. There is no round knitting in the body part, it means you knit back and forth until you reach armholes. After you start knitting all pieces separately. Please clarify what do you need to correct?
What to do From Neede 18 to 24? Can you please explain😉
I am going to make a video for this romper so stay tuned
Thanks I was knitting in the round without joining circular needles. So the body isn’t one piece with a front opening. So I guess you just continue knitting each leg separately. I am just confused.
Hi Marianne. Did you buy a pattern or you are knitting free version from the blog. Because these two patterns are absolutely different and from what you are saying I assume you are knitting paid version. Please clarify
Sorry knitting free pattern. My knitting is joined on one circular needle with front opening around the repeat rows 17 to 24. Was I suppose to keep the legs separated?
Hi Marianne. You start knitting in the round right leg then you cut the yarn and start knitting in the round left leg. When you are done, join 2 legs together plus cast on extra stitches (explained in the pattern). After that you start knitting body part IN ROWS ( not in the round) back and forth. When you reach armholes, start knitting right front, left front and back parts separately. Finish knitting hood. And after knit 2 sleeves. Is it more clear?
Yes thank you so much for answering quickly.
I paid for the Ragland sleeve pattern. How do I receive it?
Hi Karen, please check your email, I resent it to you again
Looking at knitting this up with straight needles. Do I just follow the pattern as it is or do I need change anything. Thanks
Hi Lisa, You will need to change only rows where I purl. Knit all stitches except the cable stitches. Other parts will be without changes
Good day
My name is Melanie and I’m from South Africa
Thank you so much for sharing pattern with us. I’ve been dying to knit this just as a practice for my grandchild one day
Thank you Melanie. I am happy you like it 🙂
I noticed you mentioned a video? The link would be appreciated 🌷
https://www.youtube.com/watch?v=IngiQ-0rtbM&t=258s
I want to knit this but don’t have any Dk yarn can I use worsted weight 4 ?
hi, yes sure it will be perfect ( 1 strand only)
I have purchased this pattern. I only printed a few pages and now when I go to the link it won’t let me download it again. I can’t seem to find any way to contact the seller . Hoping leaving a comment here will help me.
Thanks for letting me know. I have just sent it to you again.
Hi there. Did you knit the romper with 2 strands of wool? The pattern says to but the video you’re only knitting with one
In video I am using another yarn. Please check the gauge before knitting.
I have just purchased this pattern, and now I probably sound stupid but I am not used to circular needles, I realise the body is knitted backwards and forwards due to front opening, but are the arms and legs knitted in the round, and if so what length circular needles are best?
hi Mandy. you are right. the body is knitted back and forth while sleeves and legs in rounds. If you learn how to knit in rounds using magic loop method, it doesn’t matter what length you are going to use. You can use dpn if you feel more comfortable. Please let me know if you have questions, I will be happy to help you.
Thank you for your prompt reply and explanation, I am now able to use the magic loop method after following a YouTube tutorial, anew skill learnt, thank you
great. Looking forward to hearing from you again when you finish knitting romper. Otherwise let me know if you have any questions
I was disappointed in this pattern. It needs some additional information. There was no neckline shaping, even though it showed shaping in the diagram. The hood did not have a lot I’d explanation. There was no length given for the garter stitch sleeves or ribbing on them, once again back to the diagram and my own best judgement. I did complete it and it is beautiful, but would only reccomend this pattern to someone who is able to adapt and do not need a step by step guide. I have knit many of your hats with no issue…..
Thank you Lynette for your feedback. Paid pattern has short rows and raglan to make romper sit even better. Diagram shows sleeve length and ribbing length. This is the easiest romper version in my opinion. Moreover you can follow video tutorial. Thank you again and I hope you enjoy your romper.
I’m disputing my purchase because I can’t download and have cancelled my credit card card
Hi Derra, let me help you. When you have placed your order as I do not see any order under your name.
I was able to purchase and able to print from my husbands computer. I am having trouble with line 4. I keep ending up with extra stitches at the end of the row.
is it Round 4?