
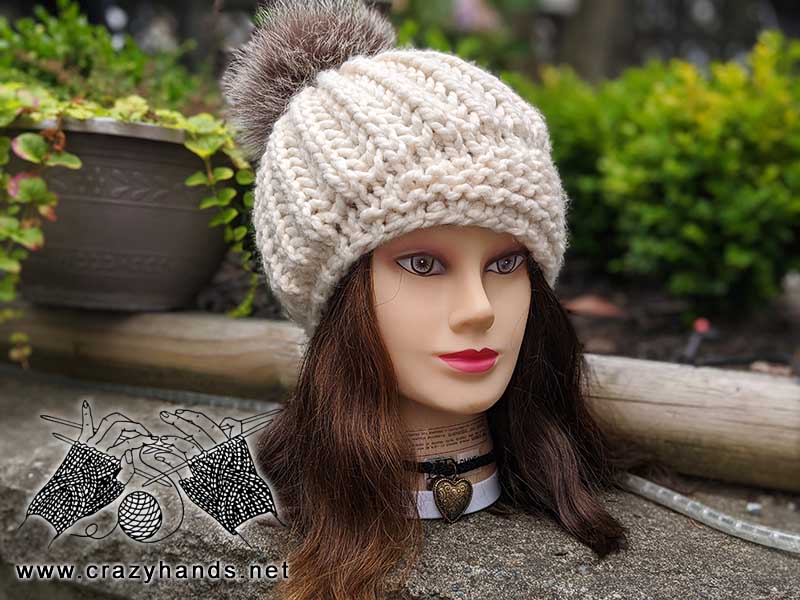
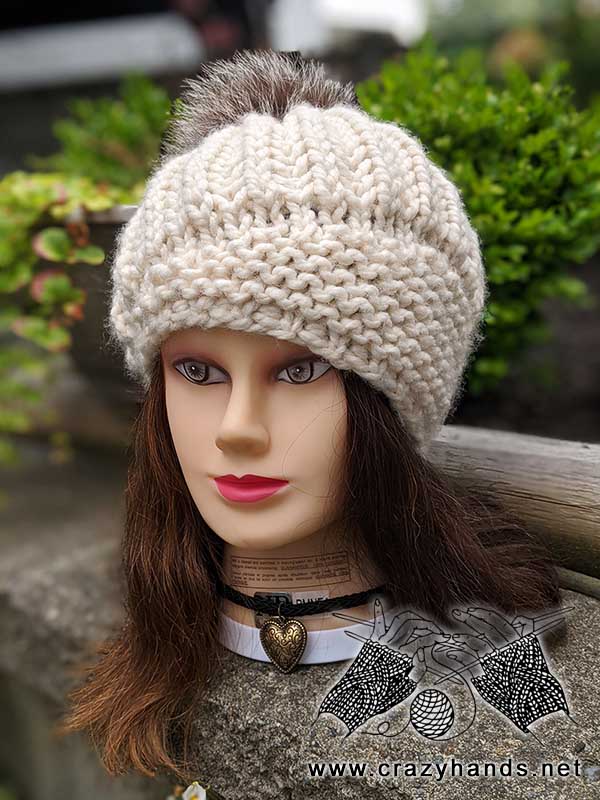
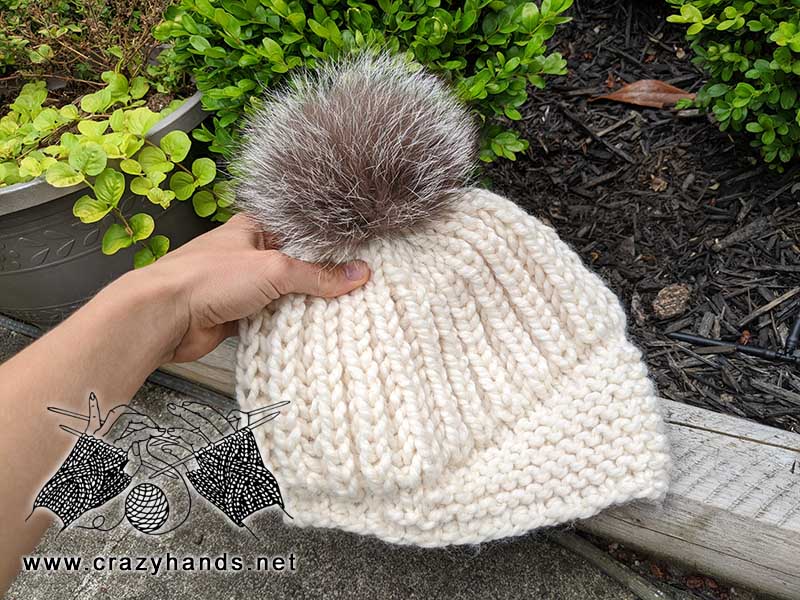
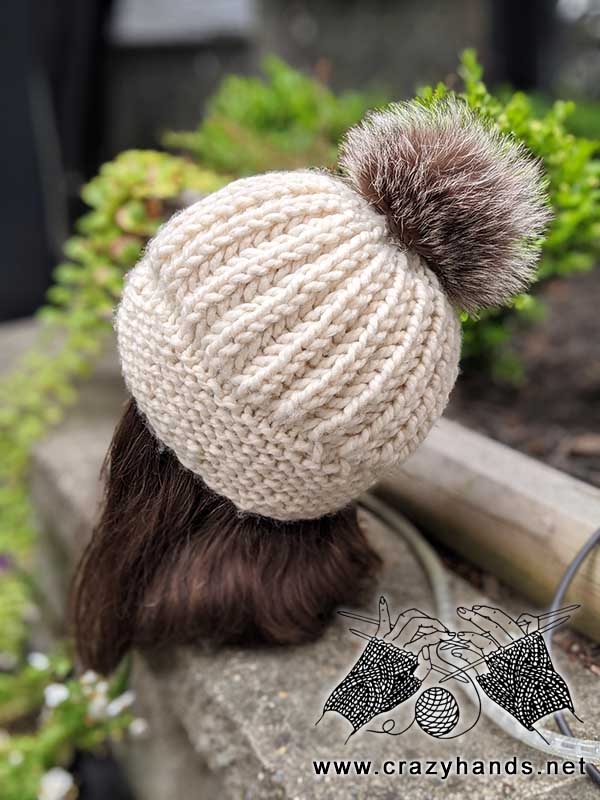
Hats, hats, hats… they are just so lovely, elegant and fun to knit projects that I can’t stop doing them. This classy look hat is simply a jewel among the hats I’ve knitted recently. Its top made using English rib stitch, accompanied with an unusual brim, made using short rows of garter stitch, give this hat magnetic attractiveness and diamond’s splendor look. Put everything else aside, take your favorite yarn and needles, and let’s knit it together.
Knitting materials and knitting tools:
<> Circular (40-60 cm) or double pointed knitting needles, size 9 (US 13/UK 0)
<> Lion Brand Wool, Ease Thick & Quick – 20% wool, 80% acrylic. Color of your choice; 1 ball
<> Min 3 locking stitch markers, scissors, hook or tapestry needle
<> Real/faux fur/ yarn pompom
Chunky knit hat size:
Adult: 54-60 cm
Gauge: 9-10 stitches in = 4 inches in stockinette
Common abbreviations of knitting stitches:
k – knit
p – purl
pm – place marker
k2tog – knit two together
yo – yarn over: bring yarn from front to back over the top of the right needle.
ryo – reverse yarn over: bring the yarn to the front over the top of the right needle.
Crown jewel chunky hat knitting pattern
Body of the chunky knit hat:
Using long tail method cast on 44 stitches or any other number divisible by 2. Place marker (#1) and join to knit in the round. If you are using invisible join in the round, please cast on one more additional stitch.
Round 1: [k1, slip next stitch with the working yarn in front] – repeat till the end of round.
Round 2: [slip stitch with the working yarn in back, p1] – repeat till the end of round.
Row 1 (short row): knit until the last 4 stitches, turn the work, pm (#2).
Row 2 (short row): ryo, knit all stitches until the last 2 before marker #1, turn, pm (#3).
Row 3 (short row): ryo, knit until the last 2 stitches and ryo before marker #2 turn, pm #2. If you are using locking stitch marker, always move it from the previous to the current row.
Row 4 (short row): ryo, knit all stitches until the last 2 before marker #3, turn, pm (#3).
Repeat Rows 3 and 4 for five (5) more times to get in total 14 short rows. If you are using another yarn weight knit until piece measures at least 8 cm from edge.
As soon as you have made a turn in the last row it is time to start getting rid of those holes.
Row 15: knit all stitches till the marker #1. (ryo from the previous round always knit together with the next stitch to prevent holes).
Round 16: knit all stitches around. (to prevent holes in this round k2tog through the back loop – knit stitch and ryo from the previous round. To make k2tog stitch look smooth I twist knit stitch making her right “leg” at the back of the needle and then knit it together with ryo through the back loop.
Remove markers #2 and #3.
We are done with a brim.
For knitting the main part of the hat I was using English Rib Knitting Stitch.
Round 1: [k1, 1 yo, slip next stitch purlwise] – repeat till the end of round.
Round 2: hold on with your finger last yo of the previous round. [1 yo, slip next stitch purlwise, purl yo and the slipped stitch together] – repeat till the end of round.
Round 3: [ knit yo and the slipped stitch together, 1 yo, slip next stitch through the back look] – repeat till the end of round.
Repeat Rounds 2 and 3 until English rib part reaches 11-12 cm.
Before shaping crown knit 1-2 rounds of simple rib – k1, p2. There will be no yarn over stitches.
Shaping the crown of chunky knit hat:
Row 1: [k2tog (twist knit stitch here), k1, p1] – repeat till the end of round.
Row 2: [k2, p1] – repeat till the end of round
Row 3: [k1, k2tog (twist knit stitch here)] – repeat till the end of round.
I have stopped at this point, but if you are using lighter weight yarn you can go on with decreases.
Row 4 (optionally): knit all stitches around
Row 5 (optionally): k2tog acround
Fasten off leaving 10 cm tail. Weave tail through remaining stitches. Pull tail to close top. Weave in ends.
Add a finishing touch by attaching your favorite faux, real fur or yarn pom pom.
14 comments
Hello- I love the pattern for this hat—but as I am following your video, I am wondering if there isn’t a mistake in the pattern under row 3 in the body? Shouldn’t it also begin with a RYO? I started noticing it when I hadn’t done it when I only followed the pattern. On the video you are beginning each short row (rows 3 and 4) with a RYO.
Thanks for the help!!!
Hi there. Yes you are right. Firstly, I thought you are asking about English rib part, but if you are talking about part with short row, yes start each row with ryo. Let me know if you have other questions or remarks.
Excellent video. I really enjoyed watching it although at first it’s a little difficult for me to follow as I’m an English knitter and we knit in a different way. I would really like to try the Continental way but after knitting one way for 60 years it’s a bit difficult to change! Thank you for the clear instructions.
Hi Jacqueline. Thank you so much for your feedback. I know it could be a little bit confusing but even though you knit an English way you will get the same result at the end.
hello loving the tutorials and blog thanks so much i hope you’re having a great holiday’s . one of your fans
Thank you so much Denise for your warm comment. I really appreciate it 🙂
I love this hat pattern and thank you for the great tutorial. I’d like to try it but I am net a really experienced knitter and I am confused by the way look like you do your k2tog. Sometimes when you knit a k2tog it looked like you were knitting the two stitches together from the back loop instead of going into the two stitches from the front. Is that still a k2tog? Does it matter if you go in from the front or back? I’m sure I’m mixed up & it just looks lint that. Anyway I’m going to give it a try.
Hi Claudia. Thanks for your question. It doesn’t matter how you knit a k2tog stitch. It always depends on how your stitches are sitting on the needles. Always decrease it in a way to make everything look smooth. Let me know if you have other questions. And wish you luck with knit hat 🙂
I am an experienced knitter but this was not an EASY pattern. I had a lot of trouble with it. Never could figure out how to do the English ribbing
Hey Karen. I would say it is upper intermediate level. The hat is really not that easy I totally angry with you. And it is not only because of the ribbing as for me. Maybe you can start from a simple scarf or a swatch learning English ribbing?
Your hat patterns are awesome! I can‘t decide which one to try first, but I think I’ll go with this! Thanks for sharing!
Thank you Lais. Great choice and I wish you luck!
Love your pattern. Haven’t knit yet but will soon. Wondering how and where to get the furry pompon??
Sheila
Hi Sheila. I usually do pom poms myself https://crazyhands.net/product-category/fur-pom-poms-hats/