
Contents

Knitting materials and tools:
24’’Circular knitting needles 5 mm (US 8/UK 6). 3 mm (UK11) – for ties.
Long mink wool (Cashmere) yarn – 75% wool, 25% nylon: 50 grams – 338 m per skein. Note: Knit with 2 strands of main and 2 strands of reinforcing (partner) yarn together.
Weight Category – Fingering. Quantity – 2 balls. If you have difficulty finding the aforementioned brand of yarn, use medium weight yarn. !!!!!Check your gauge before knitting!!!!
Crochet hook: 4 mm (3.75 mm) (for tie). Stitch markers, yarn needle.

Common abbreviations of knit stitches:
Head circumference: Teen/Adult: 53-58 cm (21-22”)
Gauge: 19 stitches = 4 inches in stockinette
26 rows = 4 inches in stockinette

Knit ribbed hooded cowl size:
k – knit
k1b – knit one below
slip p – slip next stitch purlwise
p – purl
p1b – purl one below
pm – place stitch marker
k2tog – knit two together
p2tog – purl two together
st(s) – stitch(es)
sel s – selvage stitch: always slip the first stitch knitwise, work to the last stitch, purl the last stitch
skpo – Slip, Knit, Pass Over: Slip one stitch to the right needle knitwise, knit in the next stitch and drop this stitch off the left needle, insert the left needle into the slipped stitch, pass it over the knit stitch and it’s done
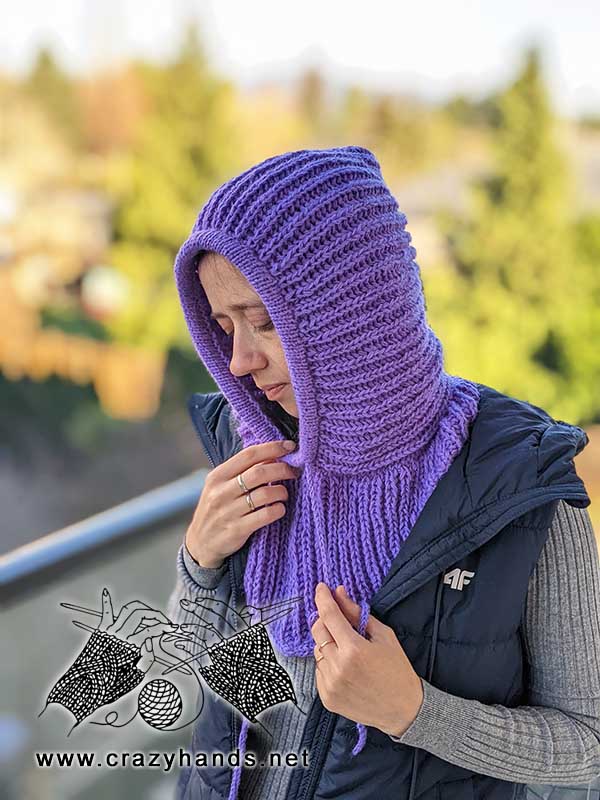
Ribbed hooded cowl knitting pattern:
Start knitting the hooded cowl
Cast on 83 stitches.
Row 1: sel s, [k1, p1] – across, k1, sel s.
Row 2: sel s, [p1, k1b] – across, p1, sel s.
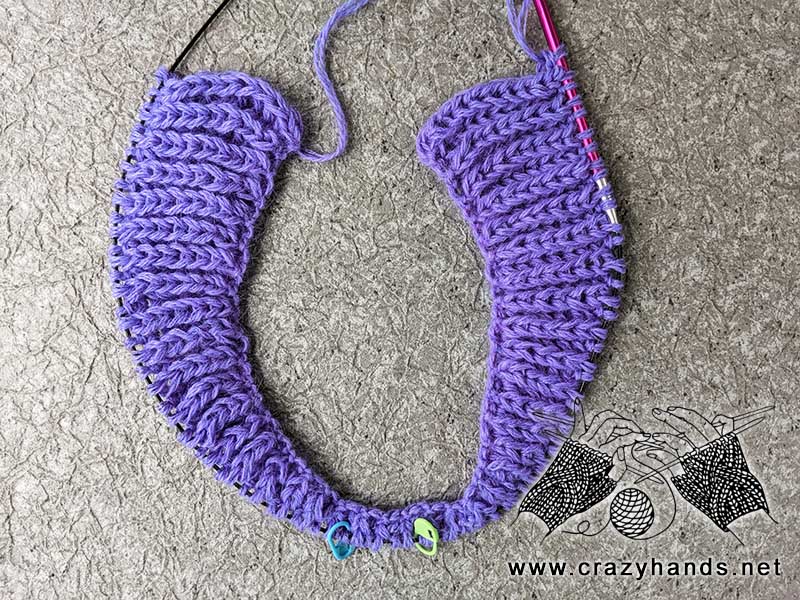
Place stitch markers as follows: 39 sts, pm, 5 sts, pm, 39 sts.
Begin working short rows before the first stitch marker.
Row 3: sel s, k1b, p1, k1b. Turn. (4)
Row 4: bring the working yarn in front and slip the next stitch purlwise. Then pull the working yarn to the back of your work over the top of the right-hand needle and distort the just slipped stitch, making it look like two stitches instead of one (let’s call it double stitch). K1b, p1, sel s. Turn.
Row 5: sel s, k1b, p1, knit double stitch, p1, k1b, p1, k1b. Turn. (8)
Row 6: bring the working yarn in front and slip the next stitch purlwise. Then pull the working yarn to the back of your work over the top of the right-hand needle and distort the just slipped stitch, making it look like two stitches instead of one, k1b, p1, k1b, p1, k1b, p1, sel s.
Row 7: sel s, [k1b, p1] – 3 times, knit double stitch, p1, k1b, p1, k1b. Turn. (12)
Row 8: bring the working yarn in front and slip the next stitch purlwise. Then pull the working yarn to the back of your work over the top of the right-hand needle and distort the just slipped stitch, making it look like two stitches instead of one, [k1b, p1] – 5 times, sel s.

Repeat the previous 2 rows, increasing the number of stitches before turning by 4 each time. On Row 9, turn after the 16th stitch; on Row 11, turn after the 20th stitch; on Row 13, turn after the 24th stitch; on Row 15, turn after the 28th stitch; on Row 17, turn after the 32th stitch; on Row 19, turn after the 36th stitch.
Finish knitting Row 20.
Row 21: sel s [k1b, p1] – across, k1b, sel s. Knit double stitch on the way and do not remove stitch markers. Turn.
Begin working short rows on the other side.
Row 4: sel s, p1, kb1. Turn (3)
Row 5: bring the working yarn in front and slip the next stitch purlwise. Then pull the working yarn to the back of your work over the top of the right-hand needle and distort the just slipped stitch, making it look like two stitches instead of one, k1b, sel s.
Row 6: sel s, p1, knit double stitch, p1, k1b, p1, k1b. Turn (7)
Row 7: bring the working yarn in front and slip the next stitch purlwise. Then pull the working yarn to the back of your work over the top of the right-hand needle and distort the just slipped stitch, making it look like two stitches instead of one, [k1b, p1] – twice, k1b, sel s.
Row 8: sel s, p1, k1b, p1, k1b, p1, knit double stitch, p1, k1b, p1, k1b. Turn (11)
Row 9: bring the working yarn in front and slip the next stitch purlwise. Then pull the working yarn to the back of your work over the top of the right-hand needle and distort the just slipped stitch, making it look like two stitches instead of one, [k1b, p1] – 4 times, k1b, sel s.
Repeat the previous 2 rows, increasing the number of stitches before turning by 4 each time. On Row 10, turn after the 15th stitch; on Row 12, turn after the 19th stitch; on Row 14, turn after the 23th stitch; on Row 16, turn after the 27th stitch; on Row 18, turn after the 31th stitch; on Row 20, turn after the 35th stitch. Finish knitting Row 21.
Continue working in ribbing (k1b, p1) until the height of the hood reaches 23–24 cm. Measure through the center (between the stitch markers).
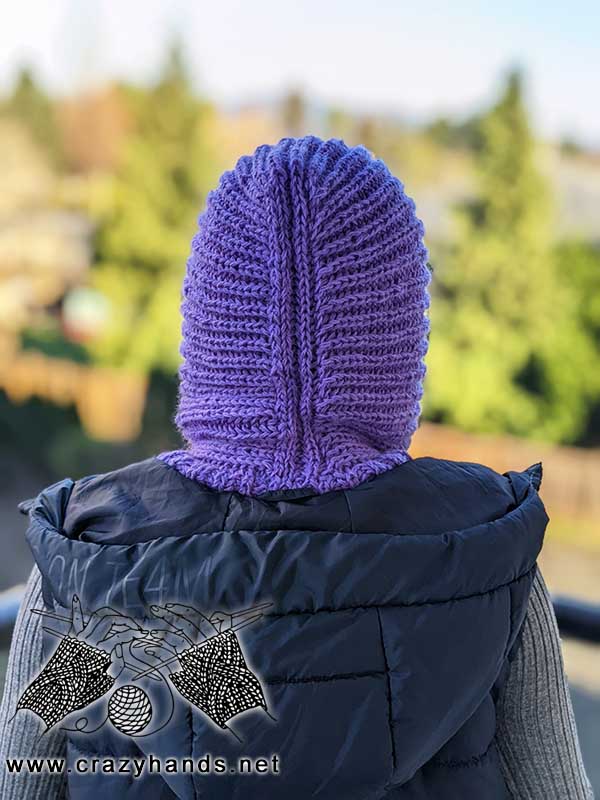
Shaping the back of the hood:
Row 1: sel s, [p1, k1b] – 19 times ( till the stitch marker). [p1, k1b] – twice, K2tog, inserting the needle one row below into the knit stitch. Turn.
Row 2: slip p, p1, k1b, p1, p2tog. Turn.
Row 3: sel s, k1b, p1, k1p, skpo. Turn.
Row 4: slip p, p1, k1b, p1, p2tog, inserting the needle one row below into the knit stitch. Turn.
Row 5: sel s, k1b, p1, k1p, k2tog, inserting the needle one row below into the first knit stitch only. Turn.
Row 6: slip p, p1, k1b, p1, p2tog. Turn.
Row 7: sel s, k1b, p1, k1p, skpo. Turn.
Row 8: slip p, p1, k1b, p1, p2tog, inserting the needle one row below into the knit stitch. Turn.
Repeat Rows 5–8 until 5 central stitches remain on the needles.
Knitting the neck of the hood:
Row 1: pm (purple), sel s, k1b, p1, k1p, p1, pm (yellow). Pick up stitches along the first edge, inserting the needle under both loops of each side stitch. Cast on 3 stitches, then begin picking up stitches along the second edge, joining the knitting in the round. The final number of stitches must be even. I intentionally mention the color of the stitch markers to make the instructions easier to follow later.
Row 2: [k1, p1] around.
Row 3: [k1b, p1] – around.
Row 4: [k1, p1b] – around. Purl the very last stitch as a regular purl stitch, not as a p1b.
Row 5: [k1b, p1] – around.
Rows 6, 8, 10: repeat Row 4.
Rows 7,9: Repeat Row 5.
Knit the chest section of the hood
Using short rows to make the front part longer and provide full chest coverage:
Row 1: [k1b, p1] – repeat until there is one stitch (purl) left before the purple stitch marker. Turn.
Row 2: bring the working yarn in front and slip the next stitch purlwise. [k1b, p1] – repeat until yellow stitch marker. Turn.
Row 3: bring the working yarn in front and slip the next stitch purlwise. [k1b, p1] – until there are 3 stitches left before the purple stitch marker. Turn.
Row 4: bring the working yarn in front and slip the next stitch purlwise. [k1b, p1] – repeat until there are 2 stitches left before the yellow stitch marker. Turn.
Row 5: bring the working yarn in front and slip the next stitch purlwise. [k1b, p1] – until there are 5 stitches left before the purple stitch marker. Turn.
Row 6: bring the working yarn in front and slip the next stitch purlwise. [k1b, p1] – repeat until there are 4 stitches left before the yellow stitch marker. Turn.
Row 7: bring the working yarn in front and slip the next stitch purlwise. [k1b, p1] – until there are 7 stitches left before the purple stitch marker. Turn.
Row 8: bring the working yarn in front and slip the next stitch purlwise. [k1b, p1] – repeat until there are 6 stitches left before the yellow stitch marker. Turn.
Continue repeating the last 2 rows, turning 2 stitches earlier than the previous turn. Repeat until there are no more stitches left to make the next turn 2 stitches earlier. The last row will look like this: bring the working yarn in front and slip the next stitch purlwise, k1b. Turn.
Next Round (right side): Place marker, bring the working yarn to the front and slip the next stitch purlwise.
-
- *Knit the next stitch through the back loop.
- In the gap between the current and next stitch, pick up the bar from front to back and knit it through the back loop to make one stitch (M1 tbl).
- Knit 1.
Repeat from * around, stopping before the central 5 stitches.
Knit the central 5 stitches without any increases.
At the end of this round, add 3 stitches and start knitting an i-cord. *Transfer the 3 stitches to the left-hand needle, then knit 2 stitches and work a skpo. Repeat from * around. Join the two i-cord ends using the Kitchener stitch. Check the video tutorial for more instructions.
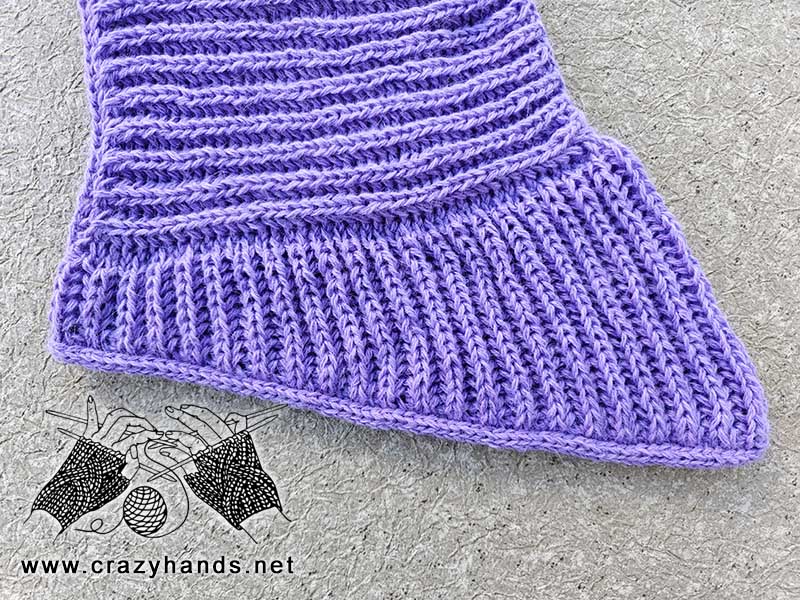
Folded edge:
Attach the yarn to the right side of the face opening. Using a crochet hook and knitting needles, pick up stitches around the face opening. Be sure to use scrap yarn, as it will make finishing the folded edge much easier—refer to the video tutorial for guidance. Place a stitch marker and begin working in rounds, knitting 10-12 rounds in stockinette stitch. Weave in all ends.
Using 3 mm knitting needles and holding 2 strands of the main yarn together, cast on 3 sts. Without turning the needle, place the stitches onto the left-hand needle. The yarn should be coming from the far-left stitch. Pull the yarn and knit the 3 stitches from the left to the right needle. Slide the stitches from one end of the double-pointed needle (or circular) to the other and knit 3 stitches again. Repeat these steps until the tie reaches 130 cm. Bind off and weave in all ends.
Wash the hood and dry flat.