
Contents
Knitting materials and tools:
Circular or straight knitting needles 3.5 mm (US 4).
Caron, Simply Soft – 100% acrylic. Color A – blue, Color B – beige.
Weight Category – (4) Medium. Quantity – 65-70 grams.
Stitch markers, yarn needle.
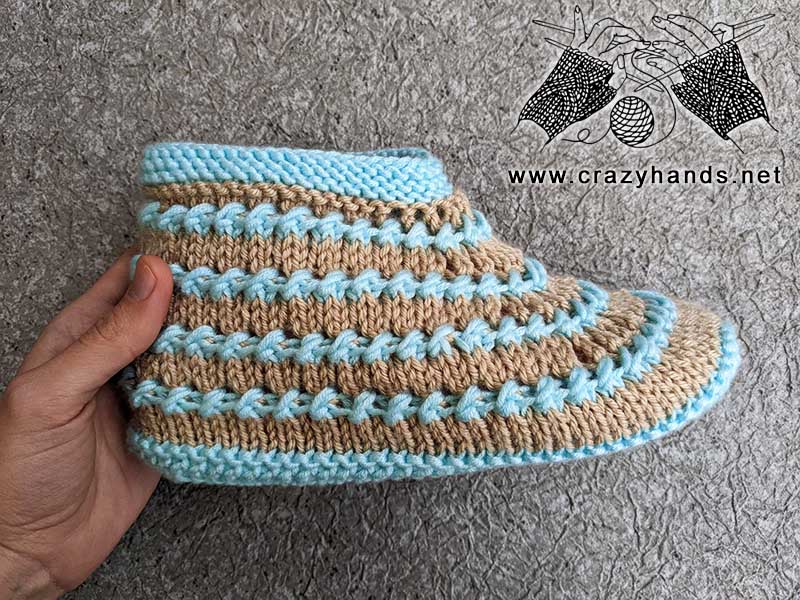
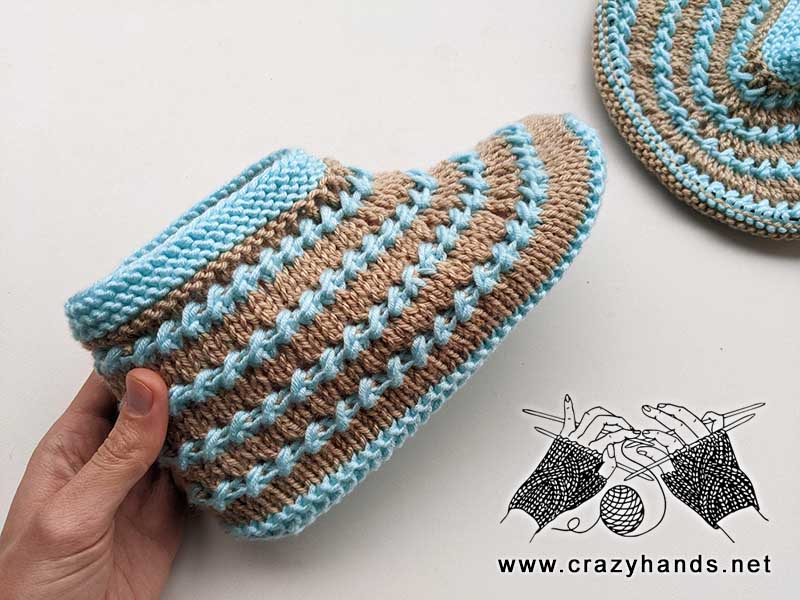
Flat knit slipper booties size:
Size: US 7-7.5 (23.5-24 cm).
Gauge: 17 stitches = 4 inches in stockinette

Common abbreviations of knit stitches:
k – knit
k1b – knit one below
k2tog – knit two together
k2togb – knit two together through the back loops
kfb – knit into the front loop and then the back loop of the same stitch to increase the stitch count by one
p – purl
p2tog – purl two together
pm – place marker
RHN – right-hand needle
LHN – left-hand needle
yo – yarn over
sel s – selvage stitch: always slip the first stitch knitwise, work to the last stitch, purl the last stitch.
k3tog – knit three together: Slip the first stitch, then knit two stitches together, and finally, pass the first stitch over the second stitch.
Flat slipper booties knitting pattern:
Color A:
Cast on 48 stitches.
Rows 1-5: sel s, knit all stitches, sel s. Do not cut the yarn.
In the row when changing color, always knit the first stitch instead of slipping it. Slip the first stitch in all other rows.
Color B:
Rows 6-7: sel s, knit all stitches, sel s.
Place stitch markers in the following order: 21 sts, pm, 6 sts, pm, 21 sts.
Row 8: sel s, k20, [yo, k1] – repeat 6 times, yo, k 20, sel s. (55)
Row 9: sel s, purl all stitches, sel s. Purl YO through the front loop.
Color A:
Row 10: sel s, k1, [skip next 2 sts, insert the needle between the 2nd and 3d stitches, pull up a long loop, yo, k2togb] – repeat across, sel s.
Row 11: sel s, [slip the central stitch (a yo stitch from the previous row) to the RHN, p2tog the two remaining stitches] – repeat across, p1, sel s.
Color B:
Row 12: sel s, knit all stitches, sel s.
Row 13: sel s, purl all stitches, sel s.
Row 14: sel s, k23, [yo, k1] – repeat 7 times, yo, k 23, sel s. (63)
Row 15: sel s, purl all stitches, sel s. Purl YO through the front loop.
Color A:
Row 16: sel s, k1, [skip next 2 sts, insert the needle between the 2nd and 3d stitches, pull up a long loop, yo, k2togb] – repeat across, sel s.
Row 17: sel s, [slip the central stitch (a yo stitch from the previous row) to the RHN, p2tog the two remaining stitches] – repeat across, p1, sel s.
Color B:
Row 18: sel s, knit all stitches, sel s.
Row 19: sel s, purl all stitches, sel s.
Row 20: sel s, k26, [yo, k1] – repeat 9 times, yo, k 26, sel s. (73)
Row 21: sel s, purl all stitches, sel s. Purl YO through the front loop.
Color A:
Row 22: sel s, k1, [skip next 2 sts, insert the needle between the 2nd and 3d stitches, pull up a long loop, yo, k2togb] – repeat across, sel s.
Row 23: sel s, [slip the central stitch (a yo stitch from the previous row) to the RHN, p2tog the two remaining stitches] – repeat across, p1, sel s.
Color B:
Row 24: sel s, knit all stitches, sel s.
Row 25: sel s, purl all stitches, sel s.
Row 26: sel s, k29, [yo, k1] – repeat 13 times, yo, k 29, sel s. (87)
Row 27: sel s, purl all stitches, sel s. Purl YO through the front loop.
Color A:
Row 28: sel s, k1, [skip next 2 sts, insert the needle between the 2nd and 3d stitches, pull up a long loop, yo, k2togb] – repeat across, sel s.
Row 29: sel s, [slip the central stitch (a yo stitch from the previous row) to the RHN, p2tog the two remaining stitches] – repeat across, p1, sel s.
Color B:
Row 30: sel s, knit all stitches, sel s.
Row 31: sel s, purl all stitches, sel s.
Row 32: sel s, knit all stitches, sel s.
Row 33: sel s, purl all stitches, sel s. Cut the beige yarn.
Color A:
Row 34: sel s, knit all stitches, sel s.
Row 35: sel s, purl all stitches, sel s.
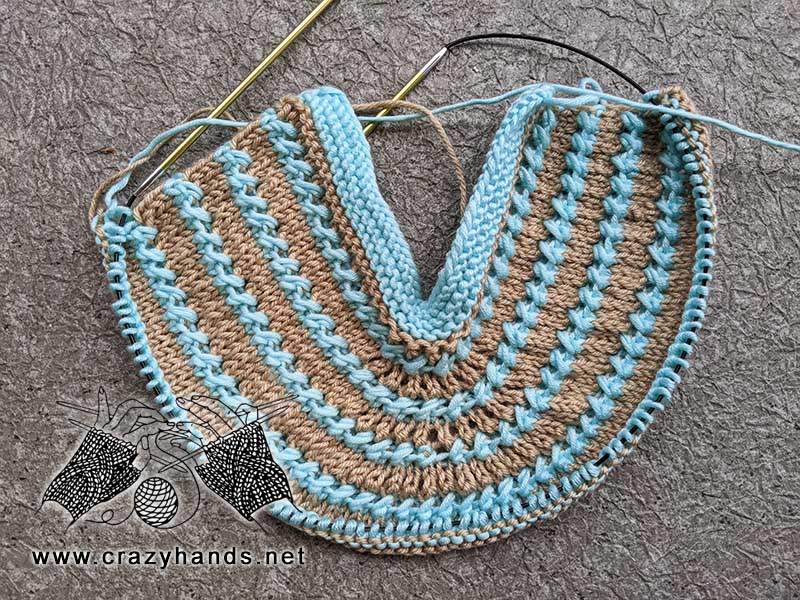
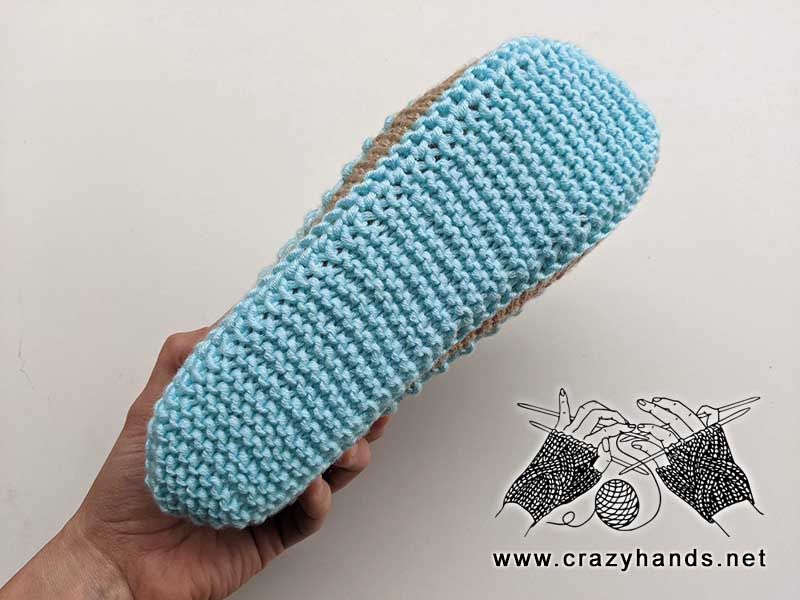
Knitting slipper soles:
Place stitch markers in the following order: 39 sts, pm, 9 sts, pm, 39 sts.
Row 36: sel s. k46, p2tog. Turn.
Row 37: sel s, k7, k2tog. Turn.
Row 38: slip purlwise, kfb, k6, p2tog. Turn.
Row 39: sel s, kfb, k7, k2tog. Turn.
Row 40: slip purlwise, kfb, k8, p2tog. Turn.
Row 41: sel s, kfb, k9, k2tog. Turn.
Row 42: slip purlwise, k11, p2tog. Turn.
Row 43: sel s, k11, k2tog. Turn.
Continue repeating Rows 42 and 43, making decreases, until you have 4 stitches on the right side, 4 stitches on the left side, and 13 stitches in the center.
Next Row: slip purlwise, k2tog, k9, p2tog. Turn.
Next Row: sel s, k2tog, k8, k2tog. Turn.
Next Row: slip purlwise, k2tog, k7, p2tog. Turn.
Next Row: sel s, k2tog, k6, k2tog. Turn.
Next Row: slip purlwise, k2tog, k5, p2tog. Turn.
Next Row: sel s, k2tog, k4, k2tog. Turn.
Next Row: slip purlwise, k2tog, k3, p2tog. Turn.
Next Row: sel s, k2tog, k2, k2tog. Turn.
Next Row: slip purlwise, k2tog, p2tog. Turn.
Next Row: sel s, k3tog. Cut the yarn leaving a 30-35 cm tail.
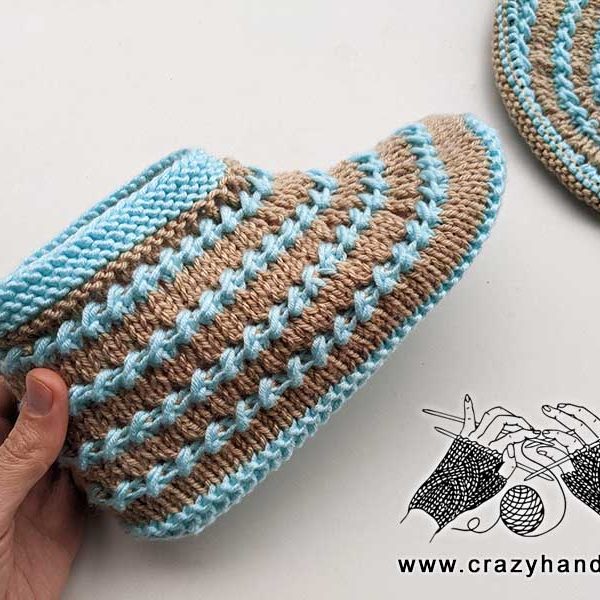
Using a yarn needle, seam the back part of the booties. Insert the needle through the front loop of the piece closest to you and then through the back loop on the other side. To ensure the colored stripes line up, I sometimes insert the needle twice, picking up two loops on one side at the same time. This way, the seam and the stripes will align perfectly. Weave in all ends.
2 comments
I am knitting the Flat knit slipper booties and when I get to the sole part, and i have torn it out and done it twice, it turns out too short and not in the middle of the body. On row 37 am I supposed to sell, K7, P2tog all the way across then turn? If i turn where it says to turn after the k2tog, it ends up being only partway across the body? Thanks for your help! Marta Berry
You turn right after [k7, k2tog] – once. We will work with the central part now and closing the side stitches. You can watch video tutorial, it might be helpful.