

Knitting materials and knitting tools:
<> Circular (29”) knitting needles 4.5 mm (US 7/ UK 7) or the size needed to get the specified gauge.
<> Crafter’s Square: 100% polyester. Color of your choice
<> Weight Category – 4. If you have difficulty to find the aforementioned brand of yarn, use any worsted weight yarn and do not forget to check your gauge.
<> 8 stitch markers, yarn needle, 8-10 buttons (diameter 25-30 mm or 1 inch), scrap yarn or stitch holder.

Knit baby cardigan size:
| Age | 6-12 months |
| Size, cm | 68-80 |
| Raglan line length, cm | 14 |
| Body length (from shoulder), cm | 34 |
| Arm’s length, cm | 20 |
| Yarn | 350 grams |
*All measurements are in centimeters if not mentioned otherwise.
Gauge: 17 stitches = 4 inches in stockinette
Common abbreviations of knitting stitches:
k – knit
kf – knit through the front loop
kb – knit through the back loop
p – purl
st(s) – stitch(es)
pm – place marker
sel s – selvage stitch: always slip the first stitch purlwise, work to the last stitch, purl the last stitch
yo: yarn over – Lay the working yarn over the right needle from front to back.
ryo: reverse yarn over – Lay the working yarn over the right needle from back to front.
k2tog – knit two together
skpo: Slip, Knit, Pass Over – Slip one stitch to the right needle, knit in the next stitch and drop this stitch off the left needle, insert the left needle into the slipped stitch, pass it over the knit stitch and it’s done
Knit baby cardigan pattern:
Using long tail cast on method, cast on 60 stitches.
Row 0: sel s, k12, pm, k2, p1(raglan line), k2, pm, k2, pm, k2, p1 (raglan line), k2, pm, k10, pm, k2, p1 (raglan line), k2, pm, k2, pm, k2, p1 (raglan line) k2, pm, k12, sel s.
Because human body is not shaped exactly the same front to back, with a help of short rows, we are going to knit yoke that will have the front neckline lower than the back one.
Row 1 (right side): sel s, k34, remove stitch marker, turn.
Row 2 (wrong side): yo, k10, remove the stitch marker, turn.
Row 3: yo, k10, knit yo and next stitch together, k4, remove the stitch marker, turn.
Row 4: yo, k2, p1, k12, knit yo and next stitch together, k1, p1, k2, remove the stitch marker, turn.
Row 5: yo, k2, ryo, k1, yo, k14, ryo, k1, yo, k2, knit yo and next stitch together, k1, remove stitch marker, turn.
Row 6: yo, k4, kb, p1, kf, k14, kb, p1, kf, k2, knit yo and next stitch together, k1, remove stitch marker, turn.
Row 7: yo, k5, ryo, k1, yo, k16, ryo, k1, yo, k5, knit yo and next stitch together, k4, remove stitch marker, turn.
Row 8: yo, k2, p1, k7, kb, p1, kf, k16, kb, p1, kf, k5, knit yo and next stitch together, k1, p1, k2, remove stitch marker, turn.
Row 9: yo, k2, ryo, k1, yo, k8, ryo, k1, yo, k18, ryo, k1, yo, k8, ryo, k1, yo, k2, knit yo and next stitch together, k11, sel s.
Row 10: sel s, k14, kb, p1, kf, k8, kb, p1, kf, k18, kb, p1, kf, k8, kb, p1, kf, k2, knit yo and next stitch together, k11, sel s.
On your needles 76 sts.
In the next row we are going to make first buttonhole.
Row 11: sel s, k1, k2tog, skpo, k6, k2tog, skpo, ryo, k1, yo, k10, ryo, k1, yo, k20, ryo, k1, yo, k10, ryo, k1, yo, k15, sel s.
Row 12: sel s, k15, kb, p1, kf, k10, kb, p1, kf, k20, kb, p1, kf, k10, kb, p1, kf, k1, cast on 2 sts, k8, cast on 2 sts, k2, sel s.
Row 13: sel s, k16, ryo, k1, yo, k12, ryo, k1, yo, k22, ryo, k1, yo, k12, ryo, k1, yo, k16, sel s.
Row 14: sel s, k16, kb, p1, kf, k12, kb, p1, kf, k22, kb, p1, kf, k12, kb, p1, kf, k16, sel s.
Go on knitting raglan making increases before and after raglan line. On the wrong side knit ryo and yo stitch through the front and though the back loop to get rid off holes.
Knit in total 38 or until raglan line measures 14 cm.
Make buttonholes every 20 rows.
Buttonholes row (right side): sel s, k1, k2tog, skpo, k6, k2tog, skpo and so on…..
Buttonholes row (wrong side): ……. at the end cast on 2 sts, k8, cast on 2 sts, k2, sel s.
In total 8 buttonholes or make more if you want.
Now on your needles 188 sts.
How to separate the body and arms of the baby cardigan.
To knit the body, you need to separate the total stitches of the yoke into stitches that will become the body, and the stitches that will become the arms.
Right side: sel s, k30, slip next 38 sts to waste yarn, cast on 4 stitches, k50, slip next 38 sts to waste yarn, cast on 4 sts, k30, sel s.
Now on your needles 120 sts.
Wrong side: sel s, knit all sts, sel s.
Right side: sel s, knit all sts, sel s.
Wrong side: sel s, knit all sts, sel s.
Continue knitting cardigan repeating last 2 rows until you reach the length 34 cm. Do not forget to make buttonholes 20 rows.
Bind off all stitches. Use any bind off method you know. Here is a link for an Islandic bind off https://youtu.be/XPk-Jb9X0-0.
Knitting the sleeves:
Slip 38 stitches placed on the waste yarn to the circular or double pointed needles. Join the working yarn, pick up 4 stitches starting at the center of the underarm, k38, pick up 4 more stitches and pm. Check video tutorial for more instructions. On your needles now 46 sts. Knit in garter stitch, as follows:
Round 1: purl all sts.
Round 2: knit all sts.
Round 3: purl all sts.
Round 4: knit all sts.
Round 5: purl all sts.
Round 6: k1, k2tog, k40, skpo, k1.
Round 7: purl all sts.
Round 8: knit all sts.
Round 9: purl all sts.
Round 10: knit all sts.
Round 11: purl all sts.
Round 12: k1, k2tog, k38, skpo, k1.
Continue knitting the sleeve doing decreases every 6 rounds until you have 30 sts on your needles. (8 rounds with decreases in total). After that knit until sleeve measures 20 cm (under arm length). Bind off all stitches.
Repeat for the second sleeve.
Knitting the hood:
On the right-side, skip first 7 sts and pick up 44 sts along the edge.
Row 1 (wrong side): sel s, p42, sel s.
Row 2 (right side): sel s, k42, sel s.
Row 3 (wrong side): sel s, k42, sel s.
Row 4 (right side): sel s, k20, ryo, k2, yo, k20, sel s.
Row 5: sel s, k20, kb, k2, kf, k20, sel s.
Row 6: sel s, k21, ryo, k2, yo, k21, sel s.
Row 7: sel s, k21, kb, k2, kf, k21, sel s.
Repeat last 2 rows making increases until you have 64 sts on your needles. (In total 10 rows with increases).
After that knit the hood without increases until it measures 19 cm.
And now we will make decreases on the wrong side.
Next row (wrong side): sel s, k28, skpo, k2, k2tog, k28, sel s.
Next row (right side): sel s, knit all stitches, sel s.
Next row (wrong side): sel s, k27, skpo, k2, k2tog, k27, sel s.
Next row (right side): sel s, knit all stitches, sel s.
Continue doing decreases until you have 56 sts on your needles. (In total 4 rows with decreases).
Last row (right side): sel s, knit all stitches, sel s.
Fold hood in half and sew it at the top with grafting/kitchener stitch https://www.youtube.com/watch?v=LjJZFgQWP4s
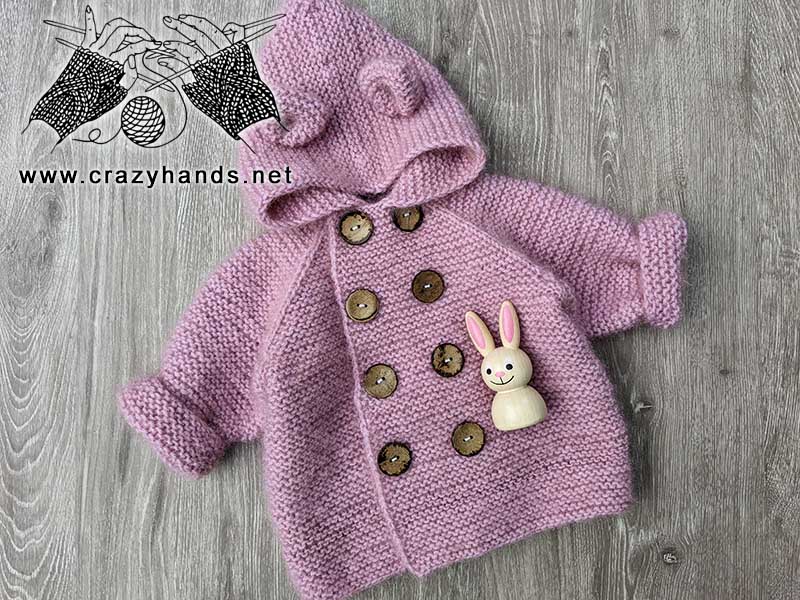
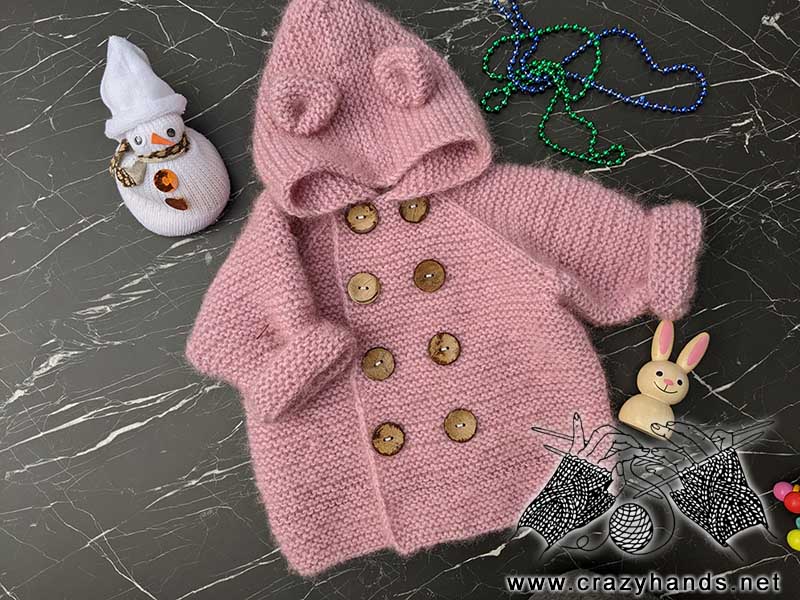
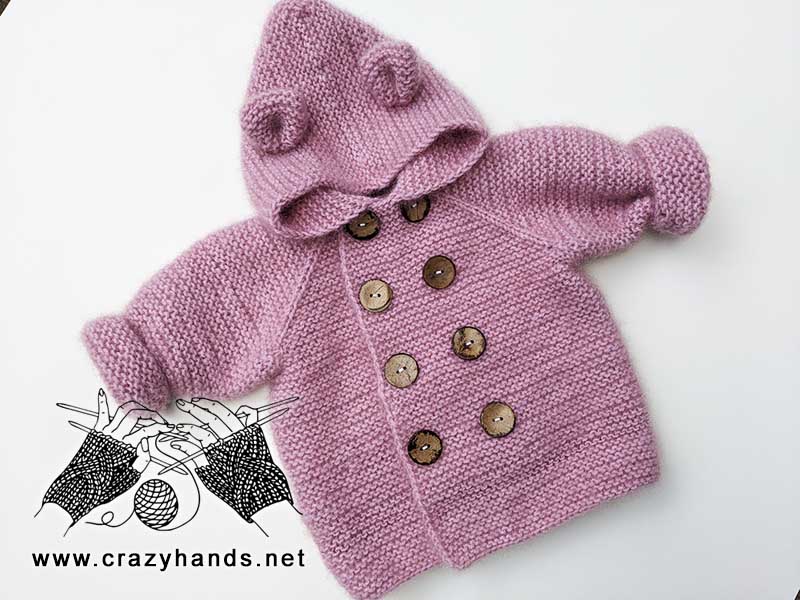
Sew buttons opposite buttonholes.
Knitting bear’s ears:
Make 2.
Cast on 12 sts. Make sure to leave the tail at least 15 cm.
Row 1: sel s, knit all stitches, sel, s.
Rows 2-30: repeat Row 1.
Bind off. Cut the yarn and leave 15 cm tail. Fold piece in the middle and shape bear’s ear. Sew up sides using mattress stitch. Check video tutorial for more instructions https://youtu.be/GF0v1XWpVtQ. Find suitable place and sew them to the hood.
Weave in all ends. Wash the cardigan and dry it flat.
6 comments
Hi Ann. I love your patterns and I am trying out one of them. What do you mean by “kf “? I know it means knit into the front of the stitch, but that’s how I always do it. Likewise, “pf “ means purl into front of stitch, but that’s how I normally do a purl stitch. Thanks.
Hi there. that’s perfect. I wrote it cuz it is important to kf this stitch to get rid off the hole that can appear. Pyy attention there is also kb stitch, knit it through the back stitch only.
Hello again! Thank you for the excellent videos. I’m thinking of attempting to using larger needles and heavier yarn (or doubling the strands!?) to make this up for a 15 month and 2 year old toddler. I love your pattern and it looks sturdy enough for my silly grands. Crossing fingers- thanks again!
Good idea Susan. Let me know how it worked for 2 yo. Also check the length of raglan line for bigger size.
I don’t see any instructions for making this for an older child.
Hi. The free version of this pattern is only for size 6-12 months. You can find full paid pattern on my blog.