
Contents
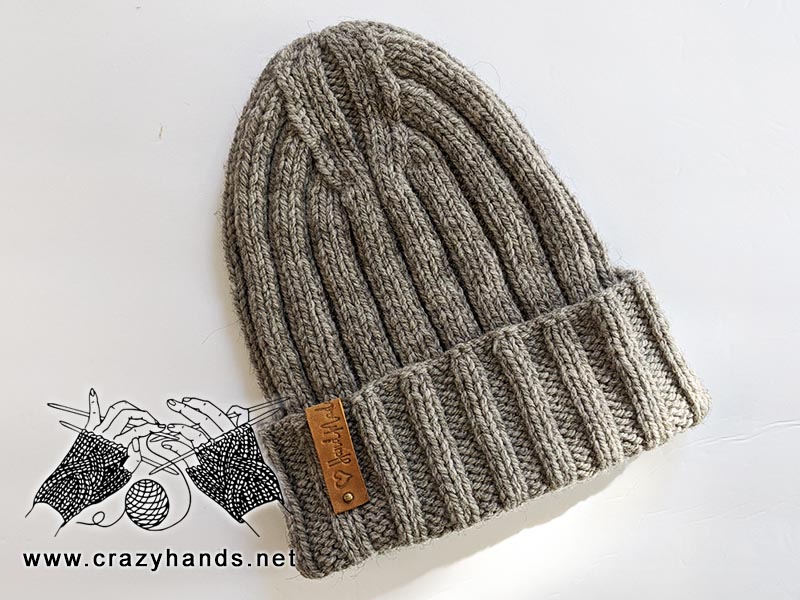
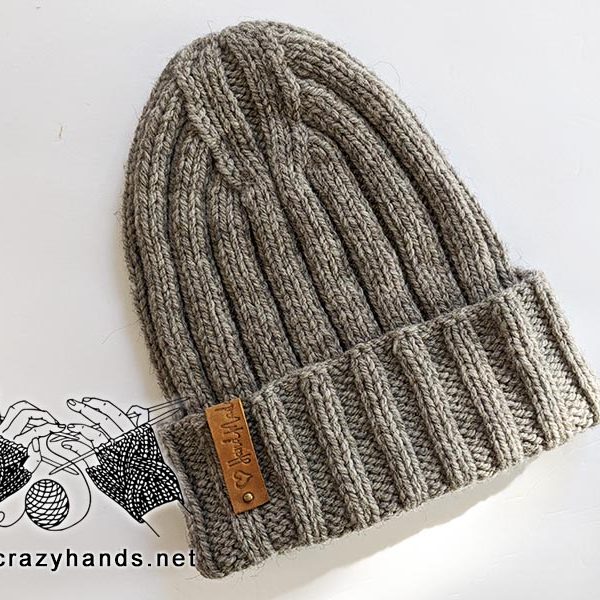
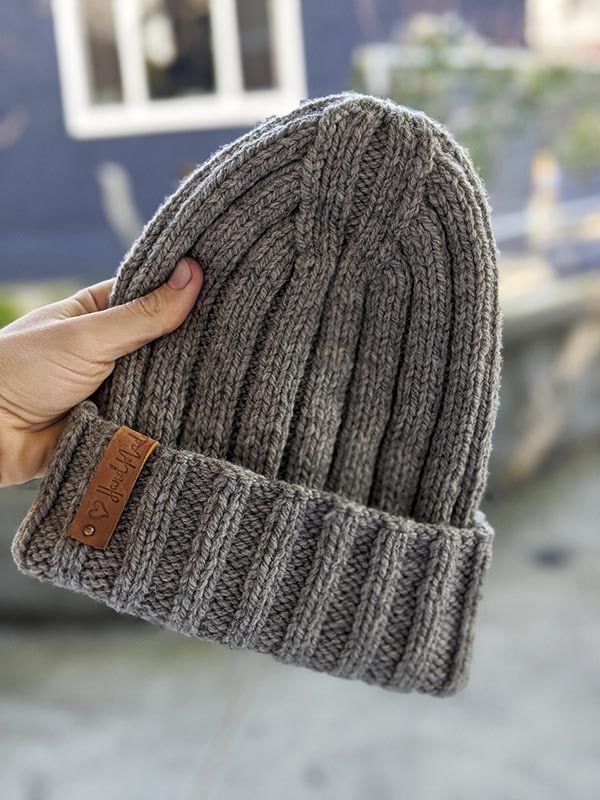
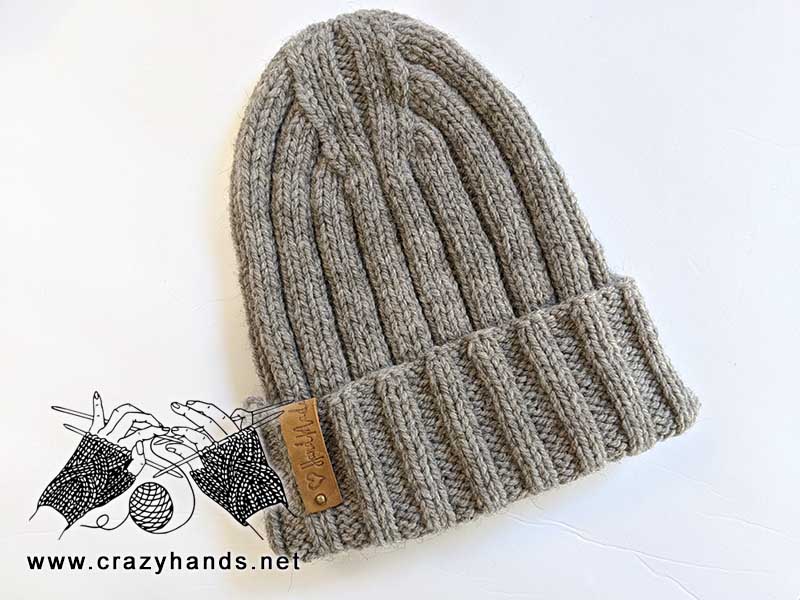
Happy Friday everyone and Happy Easter! I hope you are doing well and staying healthy during these hard days for the whole world. Even when it is a perfect weather for going out and enjoying the sunshine I beg everyone to be more patient and stay home for a little while. To keep you busy at home I am happy to share another free pattern of a ribbed beanie with catchy crown. Also take a look at Queen Ribbed Knit Beanie and choose your favourite one.
Knitting materials and knitting tools:
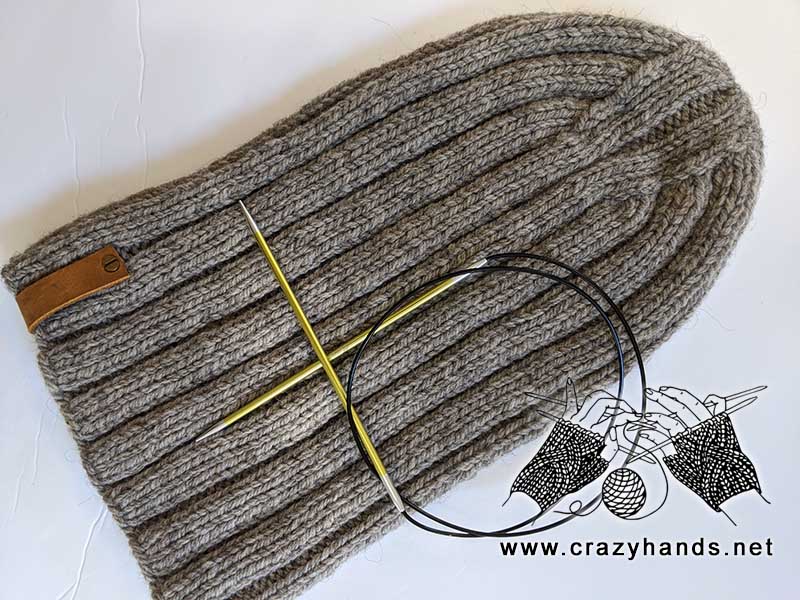
<> 5 Double Pointed Knitting Needles 3.5 mm (US 4). You can use 16” Circular Knitting Needles and magic loop technique to knit in the round;
<> Knit Picks, Simply Wool (Bulky) – 100% Eco Wool. Color #: OC, 100 grams -193 yards per skein – in total less than 1 ball;
Knit ribbed beanie size:
Adult: 53-59 cm
Gauge: 18 sts – 4 inches (10 cm) – in ribbing 3×2
Common abbreviations of knitting stitches:
k – knit
p – purl
k2tog – knit two together
skpo – Slip, Knit, Pass Over: Slip one stitch to the right needle knitwise, knit in the next stitch and drop this stitch off the left needle, insert the left needle into the slipped stitch, pass it over the knit stitch and it’s done.
pm – place marker
Body of the ribbed knit beanie:
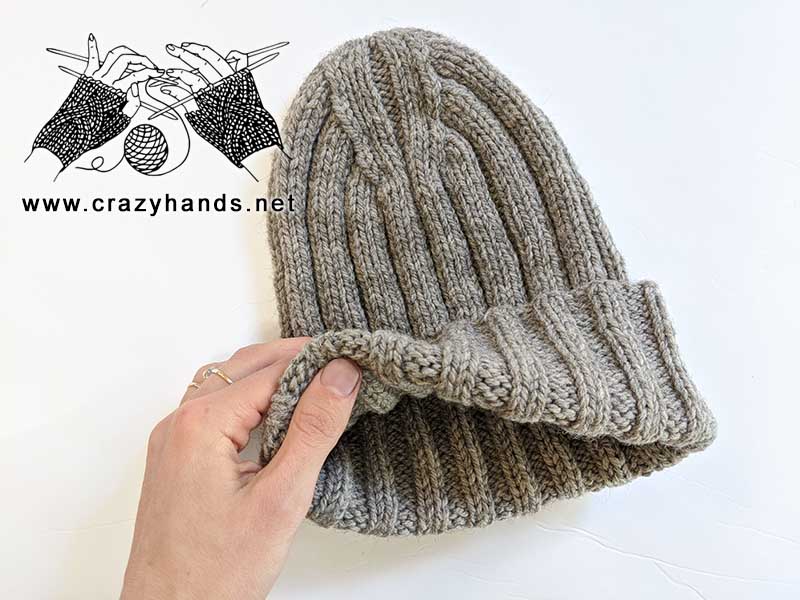
Сast on a minimum of 90 stitches or any other number that is divisible by 10. It can be 100 or 110 sts. Join to knit in the round. Place marker and be careful not to twist stiches. Rib k3, p2 until beanie reaches 26-27 cm if you want a folded brim, or 18-19 cm if you want a hat without brim. From my experience the hat with folded brim looks more complete and of course warmer for chilly days.
Shaping the crown of ribbed knit hat:
What we are going to do next is to divide all stitches for 2 parts (in my case it is 45 and 45 stitches) and place marker in between. Then find 8 stitches in the middle and place 1 marker from each side to separate them from all other stitches. Repeat for the second part. As you can see from my video explanation I [ribbed 20 sts, pm, ribbed 8 sts, pm, ribbided 17 sts] – repeat twice. The 8 sts that you have separated have look like k3, p2, k3, only this way you are going to receive desired crown.
Round 1: [ (k3, p2) – repeat 3 times, k3, p1, k2tog k2, p2, k2, skpo, p1 (k3, p2) – repeat 3 times] – repeat twice.
Round 2: [ (k3, p2) – repeat 3 times, k3, k2tog k2, p2, k2, skpo, (k3, p2) – repeat 3 times] – repeat twice.
Round 3: [ (k3, p2) – repeat 3 times, k2, k2tog k2, p2, k2, skpo, k2, p2, (k3, p2) – repeat 2 times] – repeat twice.
Round 4: [ (k3, p2) – repeat 3 times, k1, k2tog k2, p2, k2, skpo, k1, p2, (k3, p2) – repeat 2 times] – repeat twice.
Round 5: [ (k3, p2) – repeat 3 times, k2tog k2, p2, k2, skpo, p2, (k3, p2) – repeat 2 times] – repeat twice.
Round 6: [ (k3, p2) – repeat twice, k3, p1, k2tog, k2, p2, k2, skpo, p1, (k3, p2) – repeat 2 times] – repeat twice.
Round 7: [ (k3, p2) – repeat twice, k3, k2tog, k2, p2, k2, skpo, (k3, p2) – repeat 2 times] – repeat twice.
Round 8: [ (k3, p2) – repeat twice, k2, k2tog, k2, p2, k2, skpo, k2, p2, k3, p2] – repeat twice.
Round 9: [ (k3, p2) – repeat twice, k1, k2tog, k2, p2, k2, skpo, k1, p2, k3, p2] – repeat twice.
Round 10: [ (k3, p2) – repeat twice, k2tog, k2, p2, k2, skpo, p2, k3, p2] – repeat twice.
Round 11: [ k3, p2, k3, p1, k2tog, k2, p2, k2, skpo, p1, k3, p2] – repeat twice.
Round 12: [ k3, p2, k3, k2tog, k2, p2, k2, skpo, k3, p2] – repeat twice.
Round 13: [ k3, p2, k2, k2tog, k2, p2, k2, skpo, k2, p2] – repeat twice.
Round 14: [ k3, p2, k1, k2tog, k2, p2, k2, skpo, k1, p2] – repeat twice.
Round 15: [ k3, p2, k2tog, k2, p2, k2, skpo, p2] – repeat twice.
Round 16: [ k3, p1, k2tog, k2, p2, k2, skpo, p1] – repeat twice.
Round 17: [ k3, k2tog, k2, p2, k2, skpo] – repeat twice.
Round 18: Remove all markers except the one that shows beginning of the round. k2, k2tog, k2, p2, k2, skpo, k1, k2tog, k2, p2, k2, skpo, k1 (the last 2 stitches will be taken from the next round).
Cut the yarn, leaving a tail. Use hook or tapestry needle to thread this tail through remaining stitches. Pull tightly to close top of hat. On wrong side weave in ends.
27 comments
How can I print your patterns? I’ve tried saving as a pdf, no luck. Tried right clicking on the page and print is too narrow to see.
I do not see a “Print” feature on your pages.
Can you help me?
Thanks,
Mariette
Hi Mariette. You can only buy ads free patterns. Otherwise the hat is free online on my blog or Youtube
The Ribbed beanie instructions do not work out for 110 stitches. When you get to rows 13/14 there are extra stitches that does not work out. Could you please provide more instructions for shaping the crown when you have 110 stitches.
Thanks,
Kay.
Hi Kay. The instruction is same as for 90, you are going to have more decreasing rounds to get rid off those extra side stitches. Your crown will be longer and will look even better in my opinion. Write me plz if it is still unclear. Ann
Hi so I have 110 stitches also. I placed markers after following stitches by counting 27, 8, 20, 27, 8, 20 to complete the round. Does this work? If not can you please confirm for the 110 where the markers should be placed? Thanks, Megan
Hi. For 110 sts, I usually place stitch markers in the next way: 25, 8, 22, 25, 8, 22.
On many knitting blogs the designer has taken the trouble to make printing free patterns easier by including features that say “Print everything” and “Print Essentials Only”. This is a real help when carrying around the”Winter Warmers” projets I make yearly for distribution to the NY VA’s Homeless Veterans Program project. Won’t you please add this feature to your patterns? Thank you.
Hi Peggy, i hope you like this free knit hat pattern. I will make a print version for this hat soon. Let me know if you need a copy
Hi Ann ! Love the look of of your Ribbed Beanie with Catchy Crown and just purchased the perfect yarn to knit it up with, but in reading over your pattern, I do have a question. In your abbreviations you write skpo – Slip, Knit, Pass Over, but in the pattern you write “scpo”. Why the discrepancy and what does the “c” mean ? Also, I can’t wear pure wool. Will an 20% wool/80% acrylic blend work ? Thanx much.
Hi dear Senior Knitter 🙂 Thank you so much for your feedback, you are right it was my typo. I meant SKPO and not scpo. I appreciate you found it and already made changes. Thank you! Regarding yarn I believe blend will be even better, so no problem at all. Wish you a happy knitting time and let me know if you have other questions. Ann
Hi! I absolutely love the look of this hat and it was incredibly easy to knit up until the shaping of the crown. I cast on 110 and have tried multiple times to work through the crown with no luck. I’m sure there are some instances of human error on my part, but any additional support you could provide would be much appreciated so that I can finish my hat.
Thank you!
Kat
hi Kat. The instruction is same as for 90, you are going to have more decreasing rounds to get rid off those extra side stitches. Your crown will be longer. Write me what do you see wrong in your knitting
Good Afternoon,
I am knitting the Mens Beanie hat using 110 stitches.
i have Divide all the stitches in 2 parts 55 and 55 stitches) and placed a marker in between.
After that I am confused as to what to do in shaping the rest of the crown. I would appreciate it if you would explain it for me in more detail.
These are the details I am trying to follow below but, after several days of trying to work it out I am no nearer to understanding it.
Divide all stitches for 2 parts 55 and 55 stitches) and place marker in between.
Then find 8 stitches in the middle and place 1 marker from each side to separate them from all other stitches.
Repeat for the second part. Rib 20 sts, pm, rib 8 sts, pm, rib 17 sts] – Repeat Twice. The 8 sts that you have separated have look like k3, p2, k3, only this way you are going to receive desired crown.
Regards,
Wendy.
Hi!
Rib 25 sts, pm, rib 8 sts, pm, rib 22 sts] – Repeat Twice.
The beanie I am knitting has 130 cast on stitches. How many rounds do I need to do for the crown.
like I did. Until you have central stitches k2p2k2 and some stitches that surrounds them.
Hi so I have 110 stitches also. I placed markers after following stitches by counting 27, 8, 20, 27, 8, 20 to complete the round. Does this work? If not can you please confirm for the 110 where the markers should be placed? Thanks, Megan
Hi. For 110 sts, I usually place stitch markers in the next way: 25, 8, 22, 25, 8, 22.
For the 110 stitch variation, how many total decreasing rounds should you have ?
Thanks,
Megan
I did not count how many rounds but I did decreases until I got 14 sts
Ok, I feel better after reading these comments. Maybe you could help me by confirming where you would place your markers if you cast on 100 stitches?
I did 22-8-22, twice, yet it does not lead to the 8 stitches section being K3, P2, K3 as you say are needed to complete the crown correctly. If you place your markers at 25-8-22 for 110 stitches and place markers at 20-8-17 for a 90 cast on, would you suggest 23-8-19 or what??! Please help!
[Rib 25 sts, pm, rib 8 sts, pm, rib 22 sts] – Repeat Twice.
As to the above comment, I meant I originally placed markers at 21-8-21 twice, for my 100 cast on. Doesn’t work.
Hi. Could you please advise how to place markers when casting on 100 stitches? Clearly my 21-8-21 is NOT correct. Once I place them like you suggest, the remaining instructions you have for decreasing and making the crown on a 90 stitch hat should translate for my 100 stitch creation? If not, what changes need be made?
Hello! Novice knitter here who is struggling with this pattern. Originally wanted to give this hat to my son for Christmas, but didn’t get it finished. I made a hat with 100 stitches and using the pattern as printed for 90, repeated the first (K3,P2) one extra time to add the ten stitches (5 on each side). That worked fine up until Round 10. On round 11, I don’t know where to add the extra set of K3P2 stitches (at the beginning of the row or the end?) – either way it doesn’t seem to match up to the crown variation spot. I hope I am making sense. Thanks so much for whatever advice you can offer. Happy Holidays and Happy New Year!
Have you placed stitch markers in this way [Rib 25 sts, pm, rib 8 sts, pm, rib 22 sts] – twice?
yes, please send me a copy