
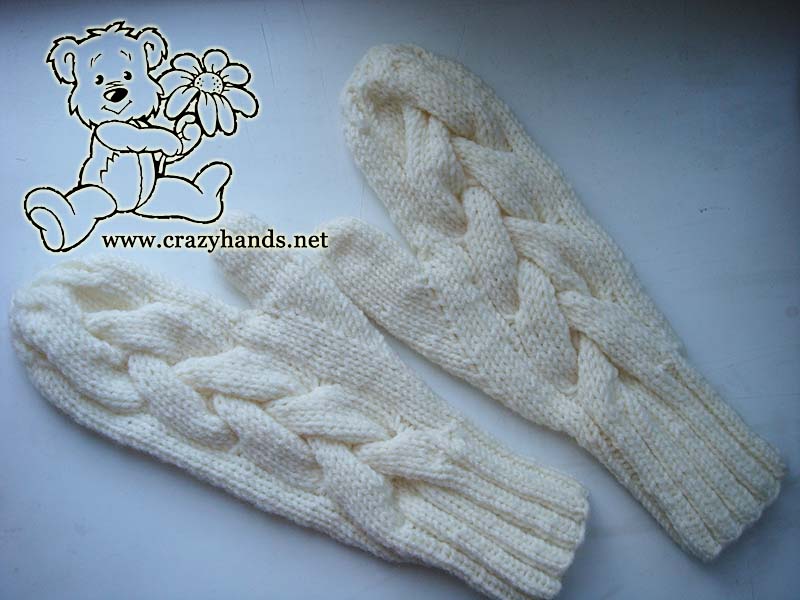
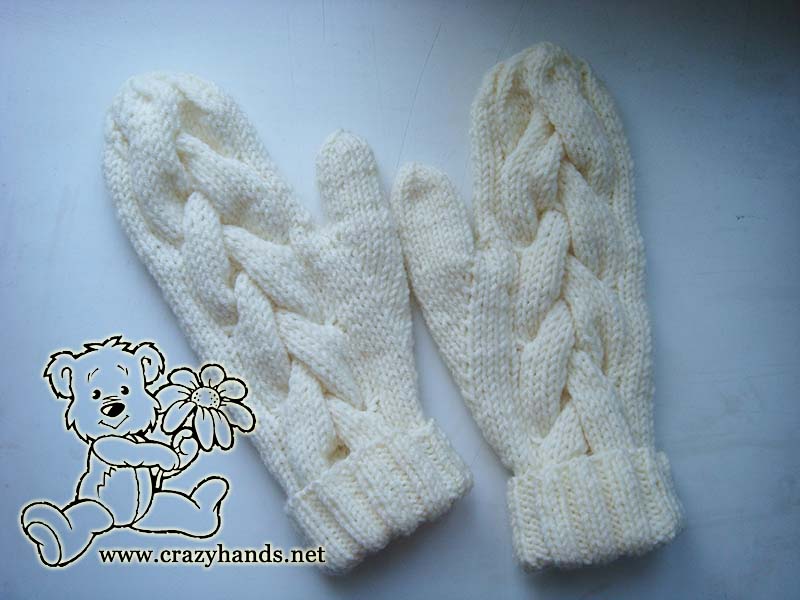
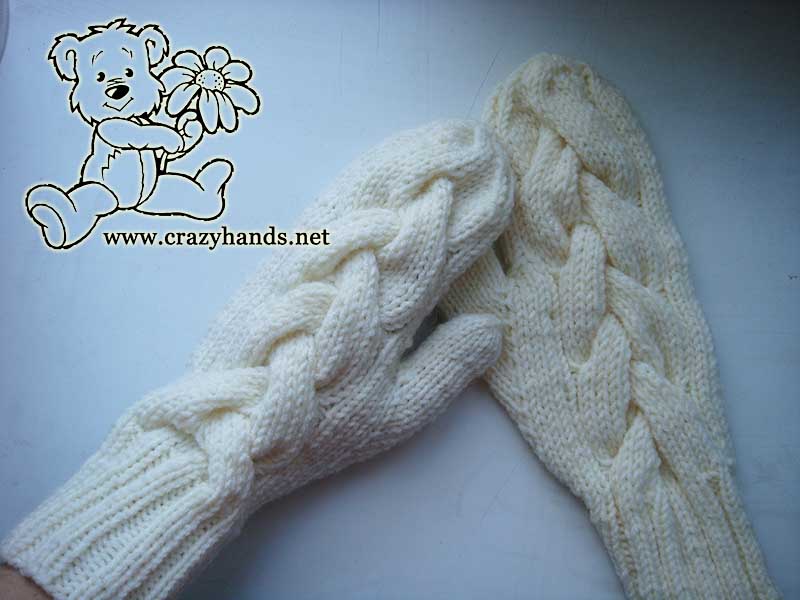
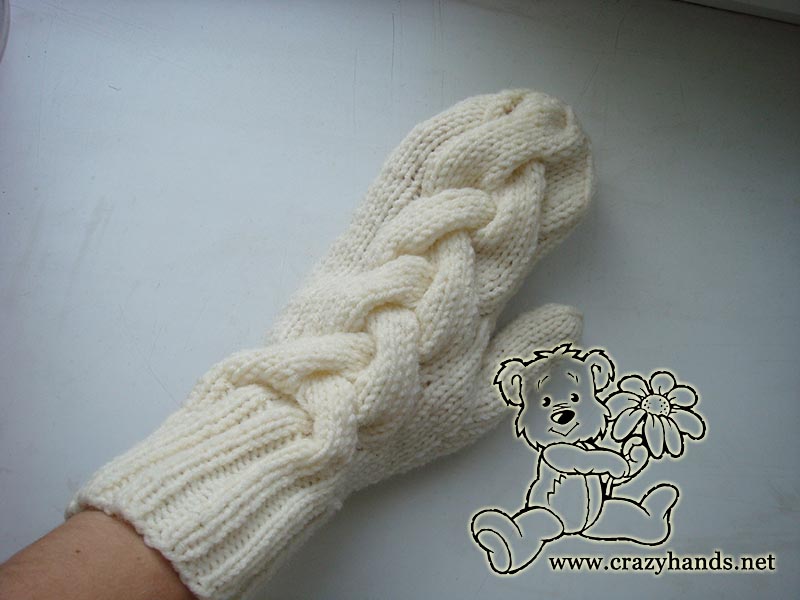
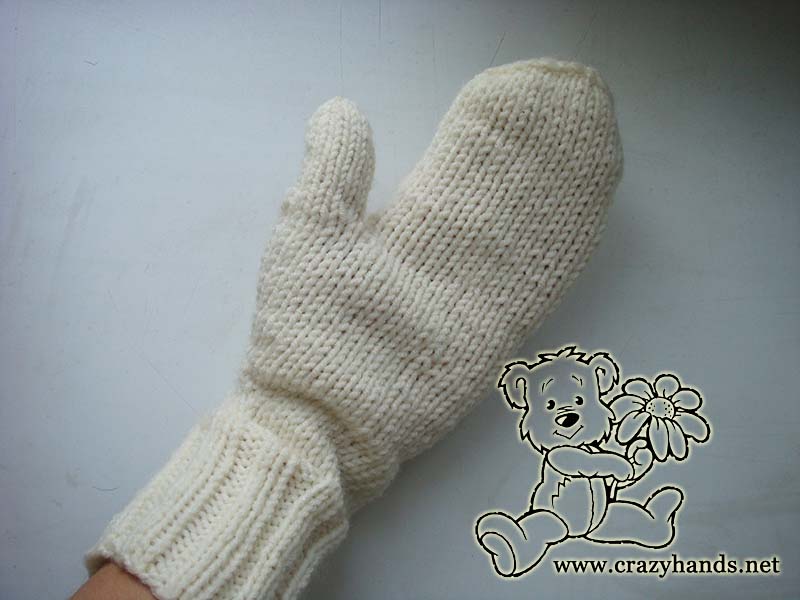
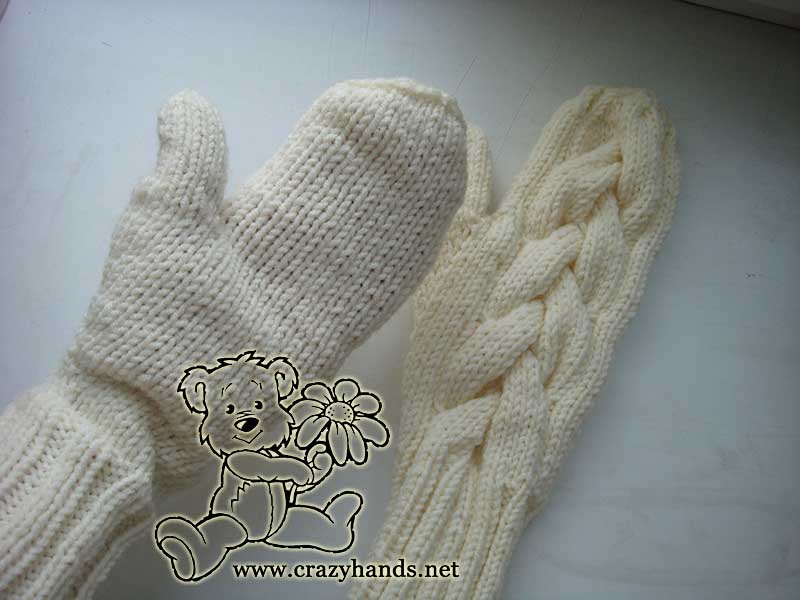
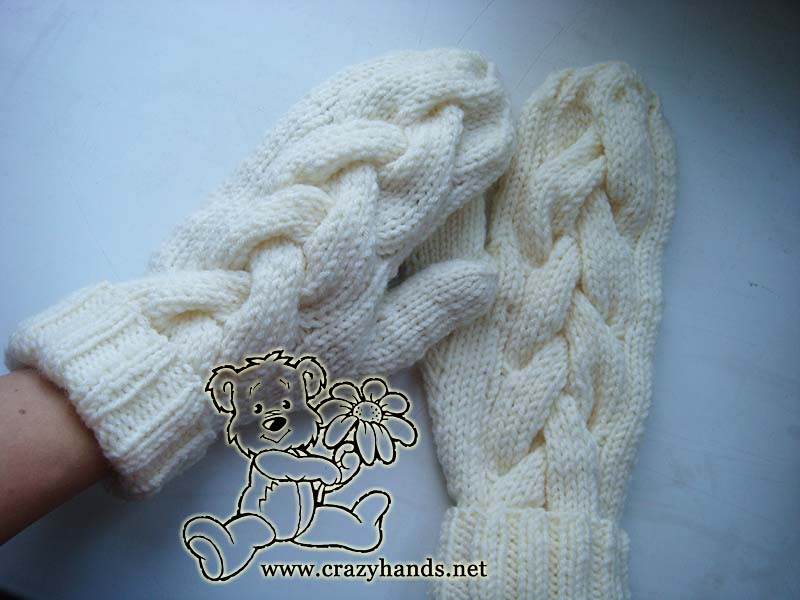
Even the weather is unseasonably warm this year I am thrilled to share another version of warm and cozy Mustard Knit Cable Mittens. This time I have added ribbing cuff that will better hug the wrist and keep your hands warm. If you are new to cabling it is a great opportunity to start from something small as cable gloves or mittens. Personally, I am a big fan of cables that is why majority of my patterns are composed of cables. Once you learn the cable secrets you are ready for something bigger such as winter cable knit hat or even a sweater.
Knitting materials and knitting tools:
<> 5 Double Pointed Knitting Needles 3 mm (UK 11/ US 3) for ribbing part and 3.5 mm (US 4) for main part. You can also use Circular Knitting Needles and magic loop technique to knit in the round;
<> Alize Lanagold, Classic Yarn – 49% wool, 51% acrylic. Ivory color: 100 grams -240 m per skein – in total less than 1 ball;
Cable mittens size:
Wrist size 16-20 сm
Length – 30 cm
Gauge: 20 stitches = 4 inches in stockinette
Common abbreviations of knitting stitches:
k – knit
p – purl
k2tog – knit two together
yoL – yarn over left: Lay the working yarn over the right needle from back to front. In the next round knit it in a way to avoid the hole.
yoR – yarn over right: Bring the yarn between needles and lay it over to the right needle from front to back. In the next round knit it in a way to avoid the hole.
Cable 6 Back (C6B): Slip 6 knit stitches to the extra needle and hold in back of work, k6 from the left hand needle, k6 from the extra needle.
Cable 6 Front (C6F): Slip 6 knit stitches to the extra needle and hold in front of work, k6 from the left hand needle, k6 from the extra needle.
skpo – Slip, Knit, Pass Over: Slip one stitch to the right needle knitwise, knit in the next stitch and drop this stitch off the left needle, insert the left needle into the slipped stitch, pass it over the knit stitch and it’s done.
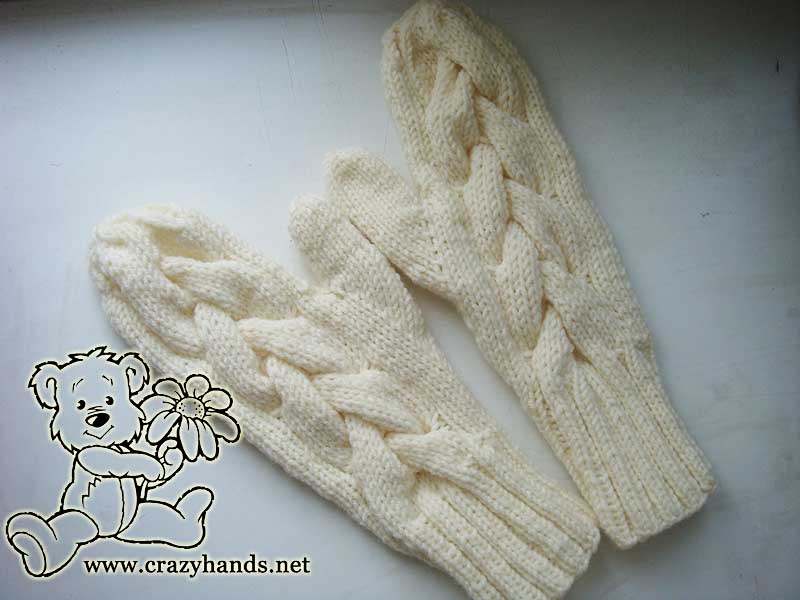
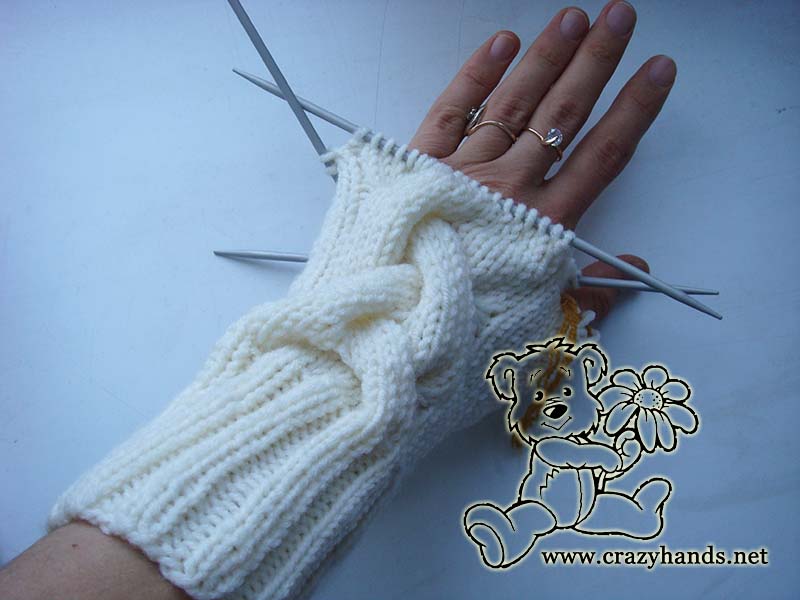
Left cable mitten pattern
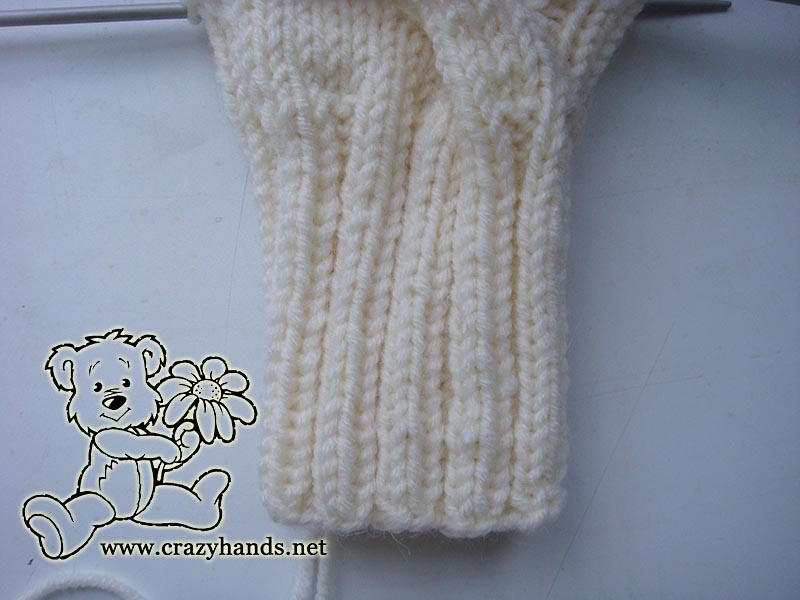
Knitting cuff of the mitten
Using 3 mm DPN cast on 40 stitches and redistribute them between needles. Rib k1, p1 for 8 cm or about 22-23 rounds.
Main part of the cable knit mitten:
Switch to the 3.5 mm knitting needles.
Round 1-3: p1, k18, p1, k20.
Round 4: p1, k18, p1, k16, yol, k4
Round 5: p1, k18, p1, k21.
Round 6: p1, k18, p1, k17, yol, k4.
Round 7: p1, k6, C6B, p1, k22.
Round 8: p1, k18, p1, k18, yoL, k4.
Round 9: p1, k18, p1, k23.
Round 10: p1, k18, p1, k19, yoL, k4.
Round 11: p1, k18, p1, k24.
Round 12: p1, k18, p1, k20, yoL, k4.
Round 13: p1, C6F, k6, p1, k25.
Round 14: p1, k18, p1, k21, yoL, k4.
Round 15: p1, k18, p1, k26.
Round 16: p1, k18, p1, k22, yoL, k4.
Round 17: p1, k18, p1, k27.
Round 18: p1, k18, p1, k23, yoL, k4.
Round 19: p1, k6, C6B, p1, k28.
Round 20: p1, k18, p1, k24, yoL, k4.
Round 21: p1, k18, p1, k29.
Round 22: p1, k18, p1, k25, yoL, k4.
Round 23: p1, k18, p1, k30.
Round 24: p1, k18, p1, k26, yoL, k4.
Round 25: p1, C6F, k6, p1, k31.
Round 26: p1, k18, p1, k27, yoL, k4.
Round 27: p1, k18, p1, k32.
Round 28: p1, k18, p1, k18, place next 10 stitches on scrap yarn, k4.
Round 29: p1, k18, p1, k17, k2tog, k3.
Round 30: p1, k18, p1, k17, k2tog, k2.

Round 31: p1, k6, C6B, p1, k17, k2tog, k1.
Round 32-36: p1, k18, p1, k19.
Round 37: p1, C6F, k6, p1, k19.
Round 38-42: p1, k18, p1, k19.
Round 43: p1, k6, C6B, p1, k18.
Round 44-48: p1, k18, p1, k19.
Round 49: p1, C6F, k6, p1, k19. If you see that the length of the mitten is shorter than you planned, repeat Rounds 44-48 once more before decreasing.
Round 50: p1, scpo, k14, k2tog, p1, scpo, k15, k2tog.
Round 51: p1, scpo, k12, k2tog, p1, scpo, k13, k2tog.
Round 52: p1, scpo, k10, k2tog, p1, scpo, k11, k2tog.
Round 53: p1, scpo, k8, k2tog, p1, scpo, k9, k2tog.
Round 54: p1, scpo, k6, k2tog, p1, scpo, k7, k2tog.
Round 55: scpo, k2, C2B, k2tog, scpo, k5, k2tog.
Round 56: scpo, k4, k2tog, scpo, k3, k2tog.
Round 57: k2tog till the end of the round, k1.
Cut the yarn and pass it through remaining stitches, cinch down and weave in ends.
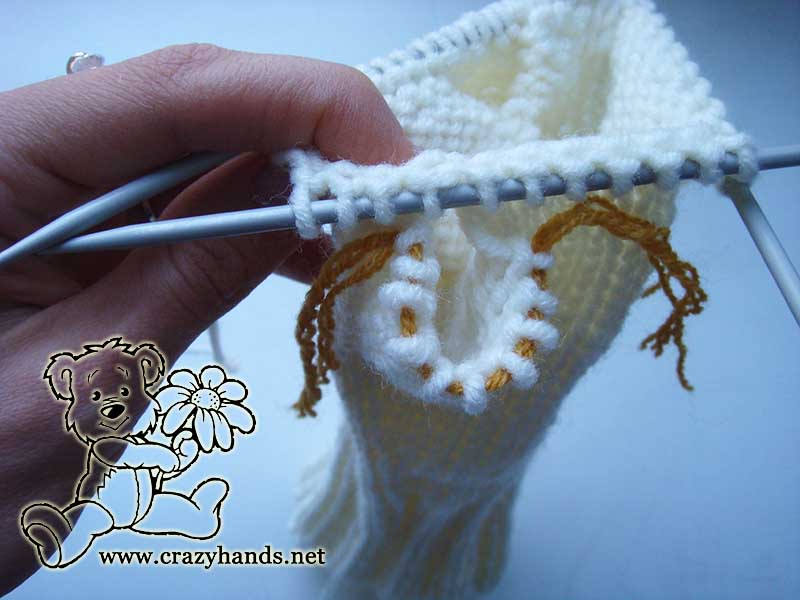
Gusset section of the cable knit mitten:
Using 3.5 mm DPN, pick up 10 stitches from holder and pick up 4 additional stitches from the hand. Knit every round until the thumb’s length is about 4 cm (1.5”) or until it reaches the tip of your thumb.
Start decreasing rounds.
Round 1: k2, k2tog, k3, k2tog k3, k2tog.
Round 2: k1, k2tog, k2, k2tog, k2, k2tog.
Round 3: k2tog, k1 k2tog, k1, k2tog.
Cut the yarn and pull it through remaining stitches. Turn the mitten inside out and weave in all ends.
Right cable mitten pattern
The main idea of knitting the right mitten is the same. I will only point the rounds with some distinctions.
Round 4: p1, k18, p1, k4, yoR, k16. Continue all other rounds with yoR.
Round 7: p1, C6F, k6, p1, k22.
Round 13: p1, k6, C6B, p1, k25. Continue alternating C6F and C6B to get symmetrically viewed mittens.
19 comments
Do you have full written pattern for right ‘Snow queen cable mitten’. It just is not working!?
Thank you
[email protected]
Hi Karen.
It is absolutely the same just dont forget alternate C6F and C6B to get symmetrically viewed mittens.
Rounds that are different:
Round 4: p1, k18, p1, k4, yoR, k16. Continue all other rounds with yoR.
Round 7: p1, C6F, k6, p1, k22.
Round 13: p1, k6, C6B, p1, k20.
Write me where it doesnt work?
Round 28 needs to be modified as well so the thumb stitches that are held are not on the wrong side of the mitten.
I now have 2 lovely “Left handed” mittens because while the cabling and the increases were reversed as per instructions, the thumb is in the wrong place.
I just finished and now have 2 left mittens doing the above instructions as the thumb is on wrong side for a right mitten.
Hi Jody, I am sorry to hear it but I have written at the bottom that Rounds 4,7 and 13 are different for the right mitten. Now you can make 2 more right hand mittens and give one pair as a present for someone 🙂
Round 13 of the right mitten doesn’t work- at the end of the round I have 25 stitches to knit not 20.
yes, right 25 stitches. You are correct
O.K. I made sure I did round 4, 7, 13 as you wrote pattern for right mitten. I am now at row 28 for the right mitten. Please confirm this row as I believe if I do it as the left mitten the thumb will not be right .
The main idea is the same but description is not identical as you are making increases from the other part of the palm.
What would the correct description be for row 28 for the right mitten? Is it p1, k18, p1, k4? And then placing 1o stitches on scrap yarn?
Here is the video tutorial https://www.youtube.com/watch?v=1dS00s1gAJs
ok so what is the description to get the thumb on the correct side? –I have not started the other mitten yet, but I agree this row needs to be different than the last mitten. You answer makes no sense.
I have checked the pattern and made a video tutorial, everything was correct https://www.youtube.com/watch?v=1dS00s1gAJs
If I do it the way I previously commented the increases will be on the opposite side of the mitten and not at the thumb. Is this correct for the right mitten? Do you have the complete pattern for the right mitten written out? This is my first time knitting mittens and I am a little confused. I adjusted the pattern as you stated above for certain rounds, alternated C6F and C6B, but it still didn’t seem to work it out correctly. Also, when I replace C6F for the CFB for the right mitten pattern do I change (p1, k6, C6B, p1, k28) to (p1, C6F, k6, p1, k28)? I did this, but I am not sure whether this is correct either.
I have checked the pattern and made a video tutorial, everything was correct https://www.youtube.com/watch?v=1dS00s1gAJs
Do you have a print button for this pattern? I want to make a pair while traveling.
sorry , I do not have such option
Thank you very much for your free pattern and precious explanations.
(I’m sorry to read how rude and demanding some people are…)
Thank you Corinne for your support. I appreciate it!