Contents
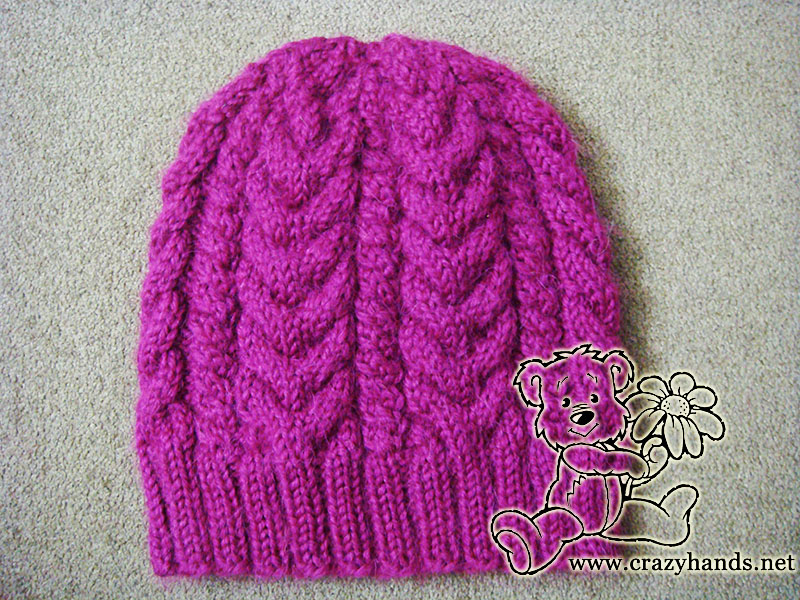
Women’s cable knit hat size:
Adult 52-54 cm
Gauge: 16 stitches = 4 inches
Common abbreviations of knitting stitches:
k – knit
p – purl
k2tog – knit two together
Cable 3 Back (C3B): Slip 3 knit stitches to the extra needle and hold in back of work, 3k from the left hand needle, 3k from the extra needle.
Cable 3 Front (C3F): Slip 3 knit stitches to the extra needle and hold in front of work, 3k from the left hand needle, 3k from the extra needle.
Cable 2 Front (C2F): Slip 2 knit stitches to the extra needle and hold in front of work, 2k from the left hand needle, 2k from the extra needle.
Knitting materials and tools:
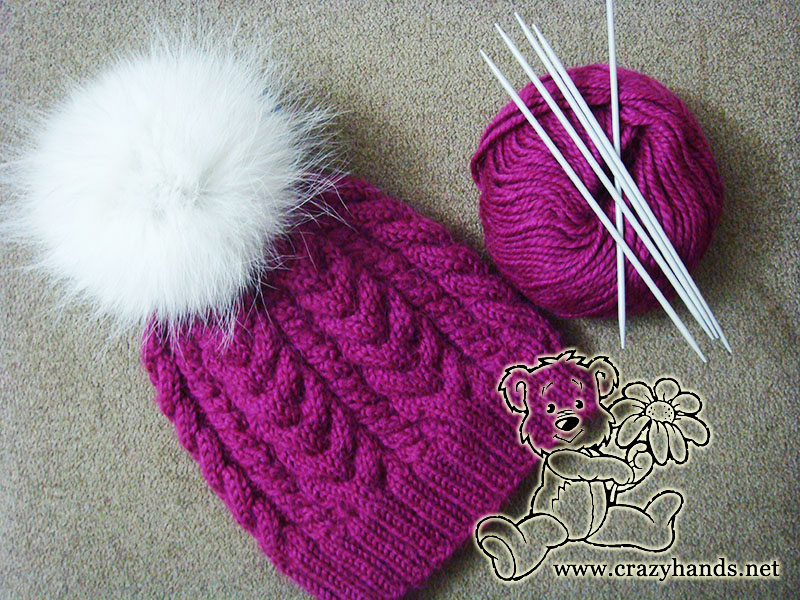
<> Double Pointed Knitting Needles 3.5 mm. It’s ok if you use a circular needles;
<> Alpacana Lanoso yarn – 35% wool, 40% acrylic, 25% alpaca. Wine color. (In total I used 1.5 skeins)
<> Fur pom pom
You can always download ads FREE version of the this cable hat pattern by supporting my site and my work. Thank you!
Women’s cable knit hat pattern
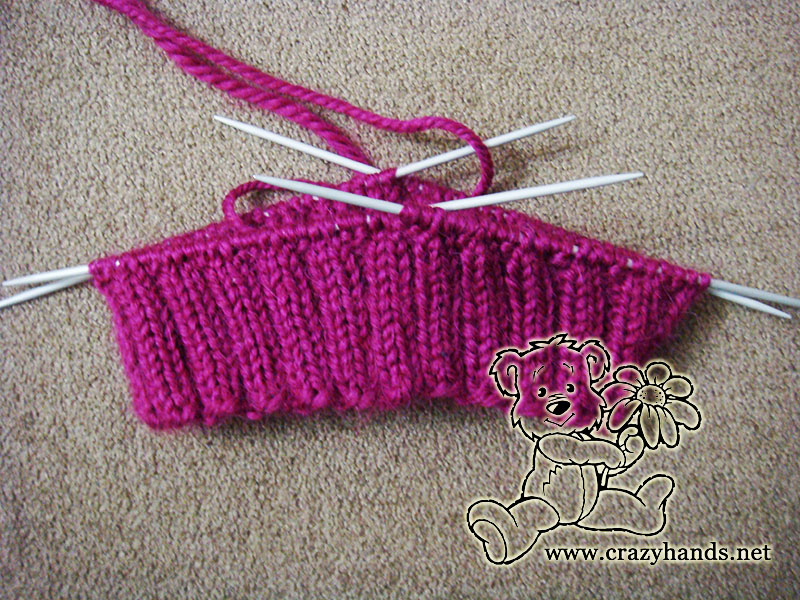
Knitting ribbing of cable hat for women:
So lets start. Cast on 96 stitches for the hat.
Round 1: Begin with rib 2 by 2 *knit 2, purl 2* keep repeating 11-12 rounds until ribbing measures 5-6 cm from the edge.
Knitting body of cable hat for women:
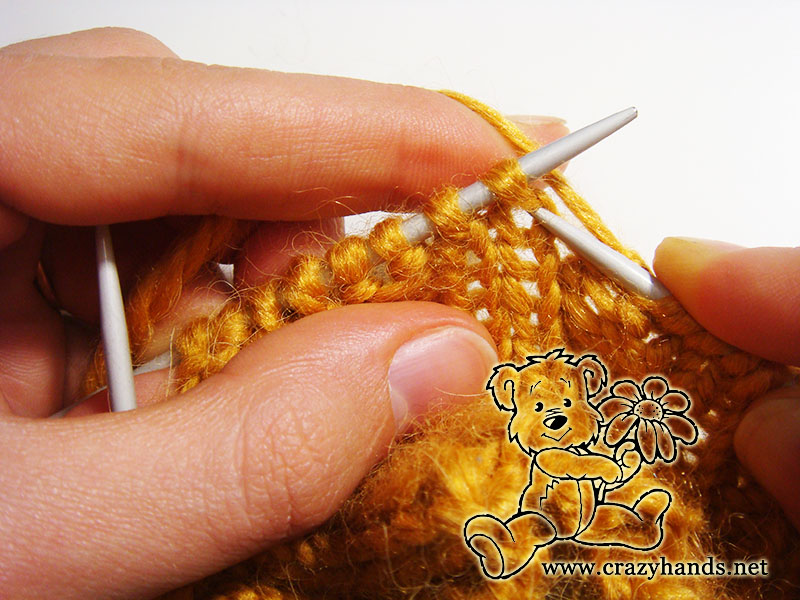
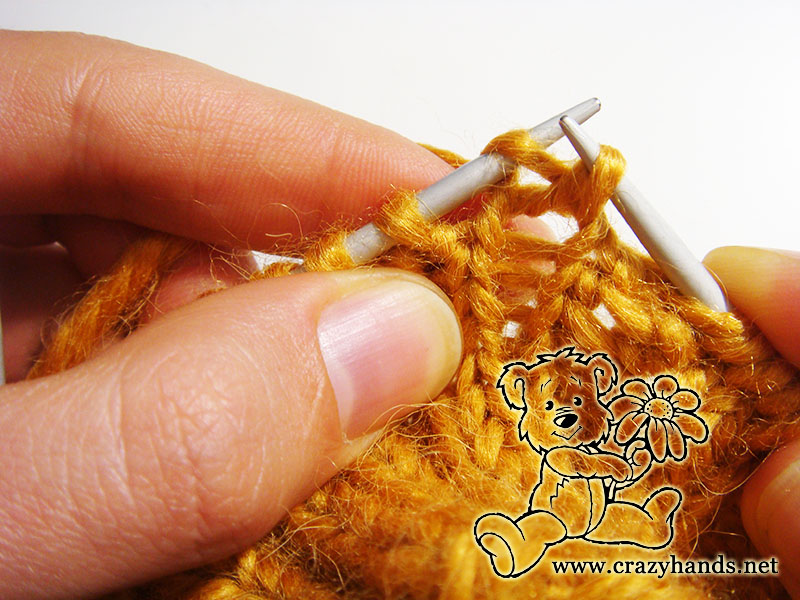
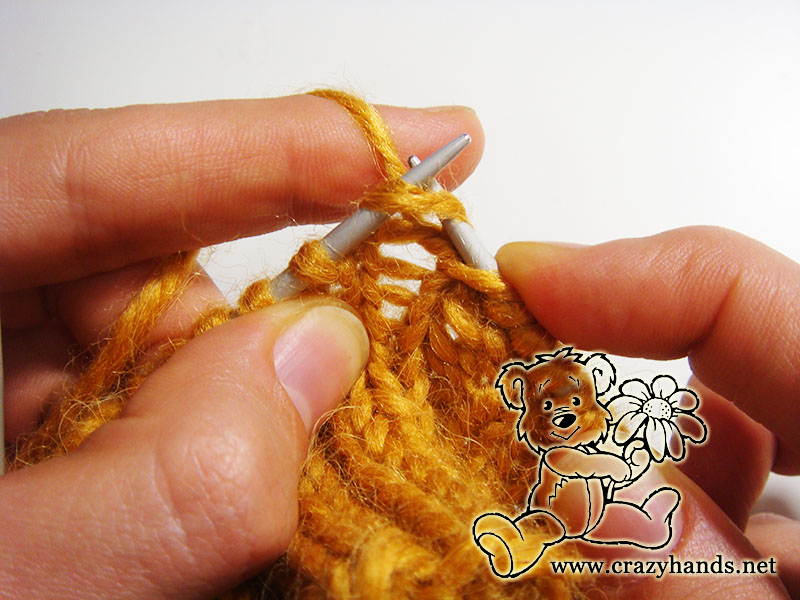
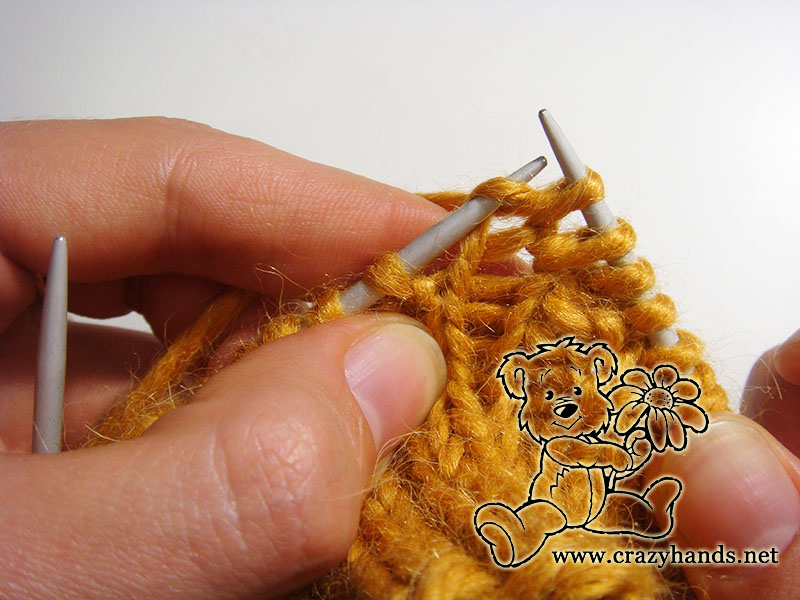
Round 1: In this round, we are going to increase. For all my previous projects I have used the same method as I believe it’s easy and accurate. Please use any methods you know. In my case, I am going to *knit one stitch from the previous round, 4 k, repeat from * to the end of round. At the end of this round, you will get in total 120 stitches.
Please check pictures below on how to knit a stitch from the previous round.
Round 2: *12k, 2p, 4k, 2p, repeat from *to end of round
Round 3: *12k, 2p, C2F, 2p repeat from* to end of round.
Round 4-5: repeat Rounds 2.
Round 6: *C3B, C3F, 2p, C2F, 2p, repeat from * to end of round.
Round 7: *12k, 2p, 4k, 2p, repeat from *to end of round.
Round 8: repeat Round 7.
Round 9: *12k, 2p, C2F, 2p repeat from* to end of round.
Round 10-11: repeat Round 7.
Round 12: *C3B, C3F, 2p, C2F, 2p, repeat from * to end of round
Repeat Rounds 7-12 and four (five) more times. The hat should now measure approximately 18-19 cm from the edge.
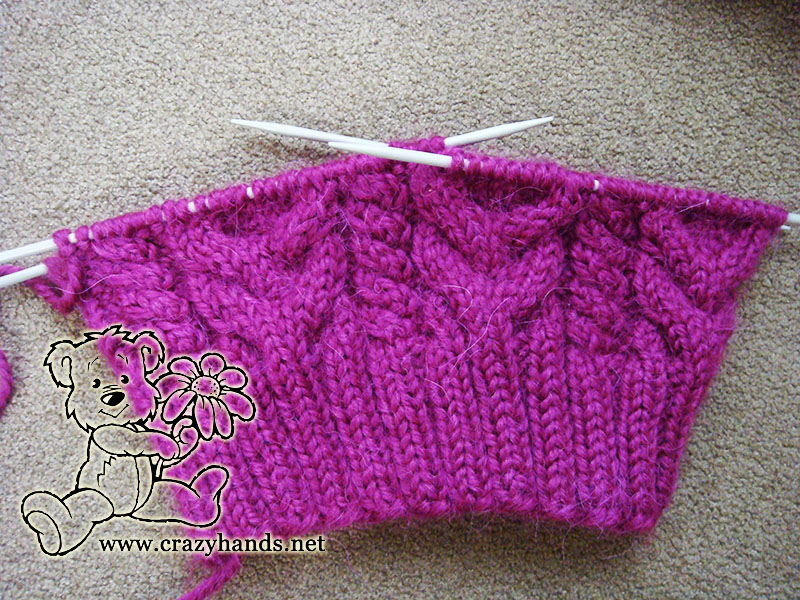
Shaping crown of cable knit hat for women
Round 1: *12k, 2p, 4k, 2p, repeat from *to end of round. Please don’t purl the last stitch in this round. From this point start Round 2.
Round 2: switch over first and second stitches how it’s shown on the pictures (where the first stitch is the last one from the Round 1), k2tog, 10k, k2tog, 1p, 4k, 1p, repeat from the start keep switching over stitches where it’s needed.
Round 3: *12k, 1p, C2F, 1p, repeat from *to end of round.
Round 4: *12k, 1p, 2 k2tog, 1p, repeat from *to end of round.
Round 5: *12k, 1p, 2k, 1p, repeat from *to end of round.
Round 6: *slip 3 knit stitches to the extra needle and hold it in back of work, [k2tog, 1k] – from the left hand needle, [k2tog, 1k] – from the extra needle, slip 3 knit stitches to the extra needle and hold it in front of work, [k2tog, 1k] – from the left hand needle, [k2tog, 1k] – from the extra needle, 1p, slip 1 knit stitches to the extra needle and hold in front of work, 1k from the left hand needle, 1k from the extra needle, 1p, repeat from * to end of round.
Round 7: *8k, 1p, 2k, 1p, repeat from *to end of round. Please don’t purl the last stitch in this round. From this point start Round 8.
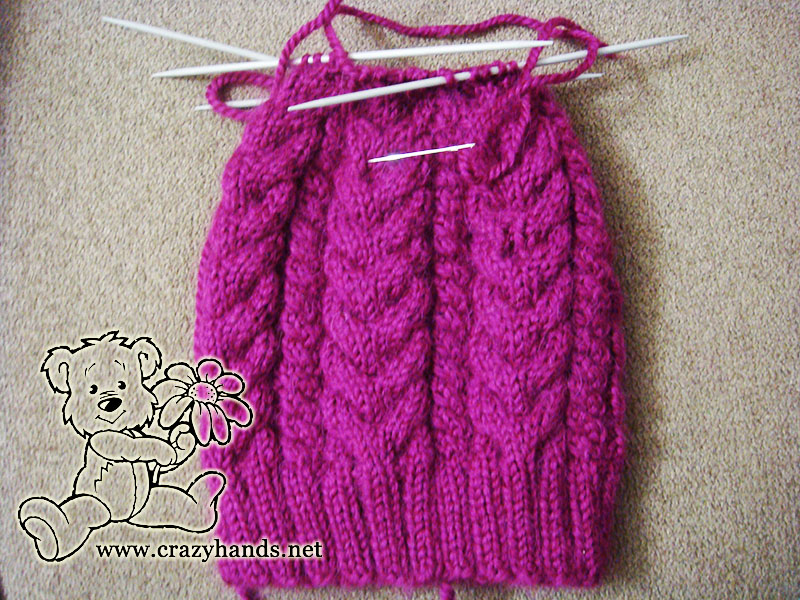
Round 8: switch over first and second stitches how it’s shown on the pictures above (where the first stitch is the last one from the Round 7), k2tog, 6k, k2tog, 2k, repeat from the start keep switching over stitches where it’s needed.
Round 9: *8k, 2k, repeat from *to end of round.
Round 10: *8k, k2tog, repeat from *to end of round.
Round 11: *8k, 1k, repeat from *to end of round.
Round 12: slip 2 knit stitches to the extra needle and hold it in back of work, k2tog – from the left hand needle, k2tog – from the extra needle, slip 2 knit stitches to the extra needle and hold it in front of work, k2tog – from the left hand needle, k2tog – from the extra needle, 1k, repeat from * to end of round.
Round 13: knit in stockinette stitch.[
Cut the yarn leaving 15-16 cm tail. Use hook or tapestry needle to pull yarn tail through the last remaining stitches on four needles. Pull tight to close the hole. Hide the tail inside of the hat and weave it in into the backside of our stitches.
I am planning to knit a cowl in a similar style but using a different color for it. I hope you enjoyed knitting this cable hat with me. If you still have any question you are more than welcome to leave a comment or ask a question.


87 comments
Hi! I had a couple of questions for the decreasing round, for row 2. First question, for the first switch over (the purl stitch) why did you knit through the back? Second question, after the K10 (the K2T) the second stitch is a purl stitch, do I switch that to a knit and then K2T? Or can I just K2T how it is and then go on? Thank you!!
Hello Brittany! In first switch over I knit through the back because it was easier and at the end decreasing part looked more accurate. What I did in the second K2T I have turned the knit stitch and K2T through the back again. Hope it helps!
So just to make sure I got it, on the 2nd K2T, you changed the K stitch instead of the P stitch making them both P stitches and then knitted them together? And thank you! I absolutely LOVE this pattern. Thanks so much for sharing!!
yes, exactly. Thank you for your kind words, please enjoy!
Hi again! Would you happen to know how many I would cast on if I took out a row of cables? To make the beanie for a smaller size head? Haha 96 cast on is just a bit to loose for my preference. 🙁 thanks for your time!
Multiples of 20
Hi. Am confused still. I have two knitting needles. I don’t know how to use four. Can you explain to me how I should go about it? Thanks
Hello Jacinta,
just follow pattern and use circular needles.
Hi, Thank you for sharing a beautiful pattern! I am finished with the brim. However, round 1 is challenging. I am trying to increase as you, but, when I arrive at the purl stitches, am I supposed to increase with a purl stitch below or knit stitch? Wouldn’t the knit stitch effect the look of the purl stitches? I am confused. I love this hat pattern so much…I don’t want to give up. Please help! Thanks
Hi, thanks for your question and I hope you still didn’t give up. You increase every 4 stitches, so it means that you increase only with a knit stitch and never with a purl, something like this – inc from previous round, 4k, inc from previous round 4k……… I hope it is clear now.
How many times and what rows do you you repeat to work the body?
Hello Rachel!
In my case I have repeated Rounds 7-12 five times, and at the end I got 18.5 cm from the edge. Finish knitting hat with decreasing rounds. Please follow your’s head circumference measurement.
How much did your yarn weigh? I’m wanting to make this or the winter cable hat but I have a skein of yarn with only 100 grams in it and they no longer make the color so am hoping to be able to make one with what I have
hello Jacki,
I have used about 150 grams for Wine cable knitted hat.
Alpacana Lanoso 35% wool, 40% acrylic, 25% alpaca – 100 gram 130 meters. How many meters do you have in your skein?
What’s the weight? The alpacana says it’s bulky but it looks worsted weight
Hi Juan, it is 6-7 wraps per inch that corresponds to bulky yarn.
Hi! Loving this pattern! I am stuck on Row 6 in the decreasing stage. I’m not sure what I’m doing with the extra needle at that point. Help please?
Hello Nicole, you just continue working as before slipping stitches to the extra needle and holding it whether in back or in front of work. Just dont forget to make decreases. Please let me know if you have more questions.
Hi there! Love this pattern but I am a bit confused on the first decrease row. What do you mean by switch ovrt first and second stitches? Do you mean flip them around so they are going from a previous to a key and an know to a presale then knit those two you just switched together and continue???
Hi, When I wrote switch I simply cross them and then k2tog. Please check pictures below Round 2
Made it for my daughter, and it was a great hit, every one wants one,. i had no problem doing it, thanks.
Can you help me with a few spots in the decrease portion of the pattern?
I love this hat. Thank you for sharing. I want to make this for my Granddaughter but I wondered what other yarn I could use as I can’t find the yarn you used? Is this a #4 or #5 yarn? I wondered what would be equivalent to use? Thank you again
Hi. You can use any bulky yarn for this hat
What does round 9 8k, 2k and round 11 8k, 1k mean. Are we just knitting the whole round
yes, you are right, just knitting the whole round
Love the pattern. What weight is the yarn you used? Aran? Worsted? DK?
Hi. It was bulky yarn
I wish u can make a vudeo tutorial, im a beginner knitter and i know the basics but these written patterns are so confusing to me when theres only pictures without a video! And i wish you can give us instructions for a child sized one
Hi there,
I’m having a few issues with this pattern and would welcome anyone to help as it looks lovely…
1) 3.5mm needles seem very small to use with bulky yarn as all other hats with bulky yarn use 6-7mm needles. Wouldn’t this make the hat very tight?
2) Also I’m confused why you need to increase to 120 stitches as essentially the eventual aim is to decrease?
3) When starting to decrease I don’t understand why you don’t purl the last stitch and also how to switch the stitches (I’m sorry the pictures are difficult to follow) and where to switch them when it says “where needed”. How do you know when it’s needed?
I really want to start and finish this to crack it. Thank you for any help in advance.
Hello Suzannah,
First of all thank you for the interest and your questions.
1) My hat was absolutely perfect when I used 3.5 mm needles. If it hurts you can also use 4 or even 4.5 mm. If you take bigger needels I afraid the hat’s size might be too big. It also depends on how tight your way of knitting.
2)We increase because braids are usually make hat too tight. It will be definitely small if you don’t do it.
3)When I wrote switch, I meant to swap stitches or cross them and then k2tog. You do it to make decreases invisible. If it is still unclear just skip this step and k2tog.
“where needed” – after knitting part k2tog, 10k, k2tog, 1p, 4k, 1p you repeat it from the start and make swaps between stitches again where it is needed.
Let me know if it is more clear now,
have a good day, Ann
Thank you so much for getting back to me Ann.
This makes sense.
Please could you clarify why the stitch isn’t purled at the end of Round 1 when starting to decrease. Surely you’re always going to be a stitch behind and the pattern won’t match.
Please could you also tell me if you’d be able to the turn the brim up and how I would change the pattern so it matches on the wrong side?
Sorry for all the questions!
I may try all this as a project when I don’t have the Christmas time pressure looming!
Thanks
Suzannah
Suzannah plz check how to make folded brim https://crazyhands.net/baby-hat-knitting-pattern/. I am sure it is easier than you thought. Good luck!
I, too, wonder why you don’t Purl the last stitch of Round 1 in the decreasing section? Seems to me there will be one extra stitch left over at the end of the round. Do I just ignore that and keep going? I have been keeping stitch markers dividing up the pattern on each round and now it will be uneven.
Also, I suggest telling us beginners how many stitches we should have after each decrease round. Thank you!
Thanks for pointing this out. Next time I will write how many stitches you have after each decreasing round.
hi
I tried to email you I just finished making your knit hat with cabled and fur pompom and want to purchase 2 of your black fur pom poms with ail to affix Please advise your recommendation thank you
Hello Gail. If you want black tail pom pom please follow this link https://crazyhands.net/shop/fur-pom-poms-hats/light-teal-blue-pom-pom/. I would suggest you to buy not tail pom poms https://crazyhands.net/shop/fur-pom-poms-hats/black-pom-pom-3/ OR https://crazyhands.net/shop/fur-pom-poms-hats/black-pom-pom/.
Simply add what you like to cart and leave delivery address. Shipment will be done within 1-3 days. Let me know if you have more questions. Ann
PLEASE ADVISE WHICH BLACK FUR POM POM S WITH TAILS I SHOULD BUY FROM YOU? DO YOU MAIL TO THE US
Hello Gail. If you want black tail pom pom please follow this link https://crazyhands.net/shop/fur-pom-poms-hats/light-teal-blue-pom-pom/. I would suggest you to buy not tail pom poms https://crazyhands.net/shop/fur-pom-poms-hats/black-pom-pom-3/ OR https://crazyhands.net/shop/fur-pom-poms-hats/black-pom-pom/.
Simply add what you like to cart and leave delivery address. Shipment will be done within 1-3 days. Let me know if you have more questions. Ann
For the body it says:
Round 4-5: repeat Rounds 2.
Is it just repeating Round 2 or is it repeating Rounds 2-3?
Hi!
Round 4-5: repeat Rounds 2. So it means repeat Round 2 twice.
I, too, wonder why you don’t Purl the last stitch of Round 1 in the decreasing section? Seems to me there will be one extra stitch left over at the end of the round. Do I just ignore that and keep going? I have been keeping stitch markers dividing up the pattern on each round and now it will be uneven.
Also, I suggest telling us beginners how many stitches we should have after each decrease round. Thank you!
Hi Lisa, you just ignore it as you said and keep going. You dont purl last stitch because I would like to start decreasing in that point. So your very first stitch marker will change its place and in the Round 2 will be before the first k2tog stitch.
if you take a piece of paper and try to draw knitting diagram for the 1st and the 2d Round then you will see why I am leaving last purl stitch of the 1st Round. Let me know if you understand it.
Thank You for this pattern, I love it ?
Hi, I also love this pattern but I don’t understand the decrease round 2. Do I switch the last and first stitches then place it back on the left needle and knit 2 together or knit the next 2 stitches together? Please respond I need help with this. THANK YOU
Hi Darlene. Yes, you are right. You switch (swap) last and first stitches then place back on the left needle and k2tog. If you have more questions, please let me know.
Thank you!! I got it!!!?
Hi Ann. I’m interested in getting 2 of the fur pom poms. Could you tell me if there is some kind of attachment on the pom poms to fasten them to knitted hats. Thanks.
Hi Suzan. Each fur pom-pom has two thin strips attached to the bottom that allows it to be easily fixed on the item (e.g. top of the hat) and easily detached for laundering.
Let me know if you have other questions. Ann
Hi for the increase I’m still getting 116 stitches instead of 120. I increased in the first stitch from the previous round then knit 4 snd continued to the end. Where did I go wrong?
Hi, did you cast on 96 stitches? In total you have to add 24 stitches. So every 4 stitches 1 increase. 96/4=24 stitches, 96+24=120 stitches
Thank you so much I calculated and realized that I need 24 and should increase in the fourth stitch; rather thst after knitting 4th.
New to knitting, what does the * mean in this pattern? Thankyou
It means repeat from this point*, or repeat what is inside **. Hope it helps
Excellent article! We will be linking to this great article on our site.
Keep up the good writing.
Thank you 🙂
I’m having a hard time downloading the patterns. Help
Hello Diane, there is no download version of this pattern. Sorry
Hi, there is one thing I can’t get right. It says that the gauge is 16 stitches for 4 inches, is that in stockinet sts, or rib by rib? I try to get that gauge but end up with 7mm needle.. am I doing something wrong?
Hello 16 stitches – 4 inches in stockinette stitch. Did you use bulky yarn?
Do you have a PDF version of this pattern for download?
Hi, no sorry, there is no PDF version
You are a gem to share so much! Thank you.
I’m looking for that ‘basketweave-looking’ hat that was shown on Pinterest. Dark grey …
Thank you 🙂
Are you waiting for this hat pattern https://crazyhands.net/simple-knit-hat-pattern/
Hi I was wanting to make this for my 9 year old, just wondering how to adjust the pattern for a child size
Hi Lynn, what is your child’s head circumference. I can help you to adjust this knit hat if I also know your gauge
I would like a babys pattern for 6-12 month old child if possilbe. I have made the hat for her mom and it came out great!Thank you, Jodie
Jodi I have answered you in your other comment
Hello, Im working this pattern and love it! The only problem is that I am on the row 6 decreasing round and think I may have made a mistake because the number of stitches aren’t working out right at the end of round. I have 90 stitches on circular needle going into the round. Could you tell me how many I should have, so I can try and figure out what I am doing wrong? Also, I would love to make this hat for my nieces baby, to match this one Im making for her, do you know how many stitches I would need to cast on for that and how to move forward with manipulating the pattern for an infant?
thank you, Jodie M.
So as i understood you manage to finish adult size?
Hi. As i understand you have done adult size ?
Hi, I was wondering if I could get the pattern for baby 6-12 months?? I made the hat in adult size and love it. Now I want to make it for my niece. Thank you, Jodie
Hi. I dont know your gauge. After rubbing part the total number of stitches have to be devicible by 20. I would suggest you have the total number of stitches after rib equal 80. But use the yarn that is lighter than i used in the pattern. Dont change the pattern simply follow it. Let me know if it clear
Good Morning, on row 12 in the decrease there is only one * , when it says to repeat??
Hi. Repear from the beginning of the round 12
Hi there. I love your pattern. A little confused at Round 3. If I knit *..* it leaves me with 2 extra stitches At the end of the round. Does that mean the 2 extra stitches get included in Round 3 of k12? If I do that, Round 4 will have an extra 4 stitches at the end of the row. Help!
Hi Margaret. Are you talking about Round 3 of the main part? Do you have 120 sts in total? the part between *..* has 20 stitches, so you repeat this part 6 times, it is impossible to have 2 extra sts (120/20=6). Please check again and let me know.
Good morning. I have 120 stitches. Oh my goodness, I missed a p2 after the 2nd C2F in Round 3. Sorry. Appreciate your prompt reply. Have a great day. Be safe!
Good luck Margaret and take care as well!
Can I get an easy to print copy of this pattern? I keep getting sentences cut off when I print? Also curious if this is made with a worsted weight yarn! I cannot get the yarn you used in the color my daughter wants and I’m having troubles figuring out what yarn would be comerable thank you
Hi, Ads Free Pattern is here https://crazyhands.net/shop/knitting-patterns/ads-free-gorgeous-cable-hat-pattern/. This hat is done with bulky yarn but worsted can work as well if you take a little big bigger size needles. I would say Bernat Roving can work here or Knit Pricks Simply Wool. You can also knit in 2 strands of yarn if you have something lighter in your stash 🙂
Thank you for the brilliant pattern, my hat came out great. Would love matching mittens too.
These mittens will make a perfect match https://crazyhands.net/snow-queen-cable-knit-mittens-pattern/
Hi ,I love your patterns ,I have the hat ready to shape the crown but I do not understand how it’s done at all is there a easier way of doing it , i,m so frustrated with it
yes, without video it is a little bit frustrating. Do you want to do it round by round with me? I can help you
Hi Ann! Thank you for sharing this pattern – Just finished this hat in antique white yarn it made up beautiful.
Thanks for your feedback and happy you like it