
Contents
Knitting materials and tools:
Circular knitting needles 3.5 mm (US 4) for the main part and waist ribbing and DPN or circular 3 mm (US 5 / UK 9) for the leg’s ribbing.
Bernat, Softee Baby (3 – light): 100% acrylic, skein140 g – 361m
Crochet hook (3 or 4 mm), optionally beads for the tie, cable needle, tapestry needle for weaving in ends and grafting, scissors, stitch markers, scrap yarn or stitch holders.
Common abbreviations of knit stitches:
k – knit
p – purl
st(s) – stitch(es)
pm – place marker
LHN – left-hand needle
RHN – right-hand needle
WS – wrong side
RS – right side
LLI – left lifted increase: inset the left-hand needle from back to front into the stitch two rows below the one you just knitted on the right-hand needle. Lift it to your left needle without twisting and knit it through the back loop.
RLI – right lifted increase: insert your right-hand needle from back to front into the stitch one row below the first stitch on your left-hand needle. Lift it to your left-hand needle and then knit it.
k2tog – knit two together
p2tog – purl two together
skpo: Slip, Knit, Pass Over – Slip one stitch to the right needle knitwise, knit in the next stitch and drop this stitch off the left needle, insert the left needle into the slipped stitch, pass it over the knit stitch and it’s done.
Cable 1 Front (C1F) – Slip next stitch to the extra needle and hold in front of work, p1 from the left-hand needle, k1 from the extra needle.
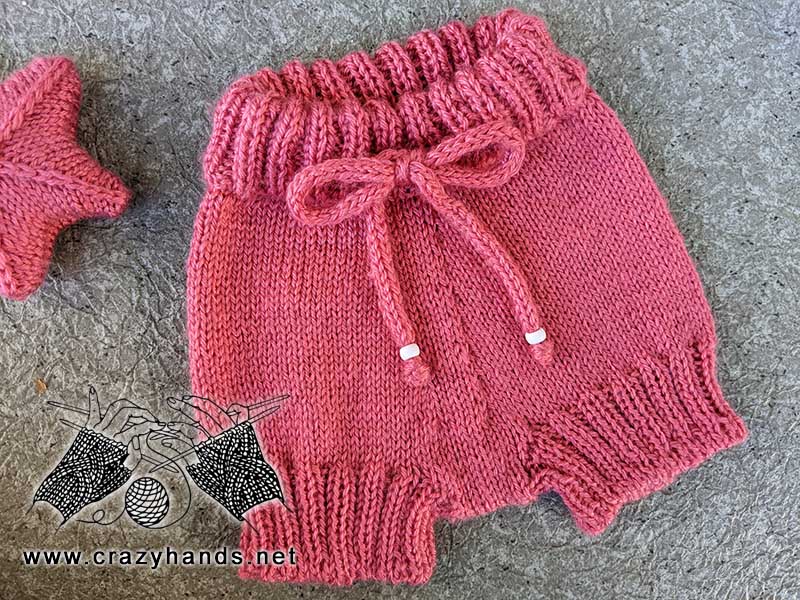
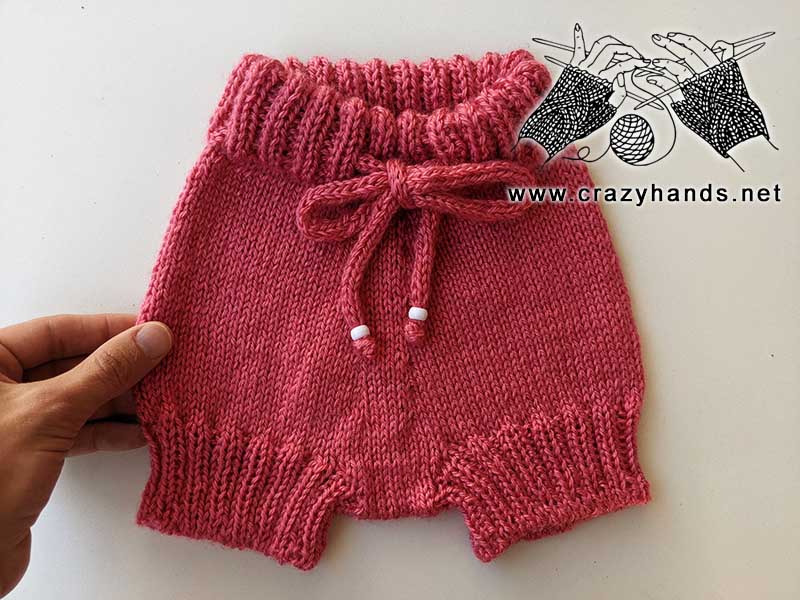
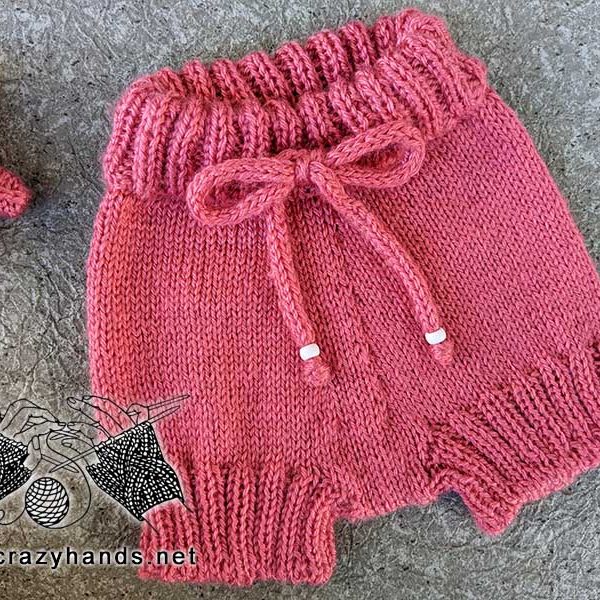
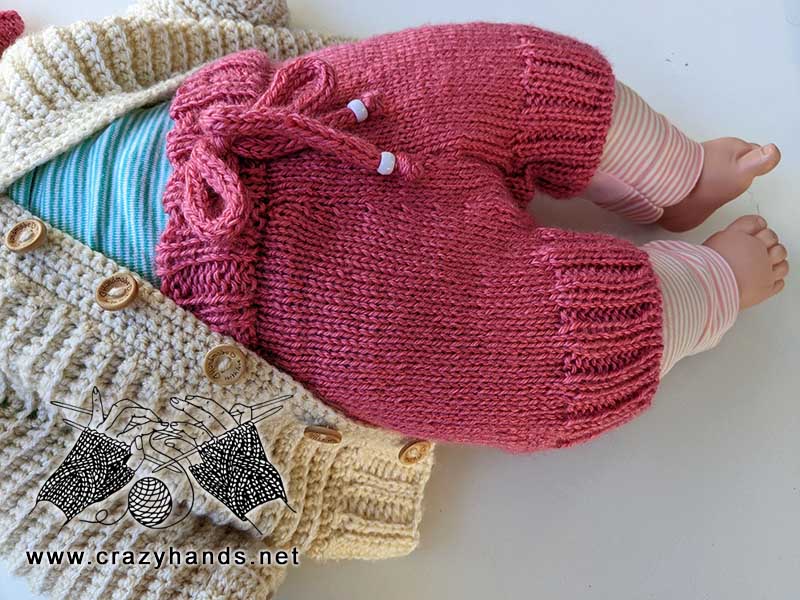
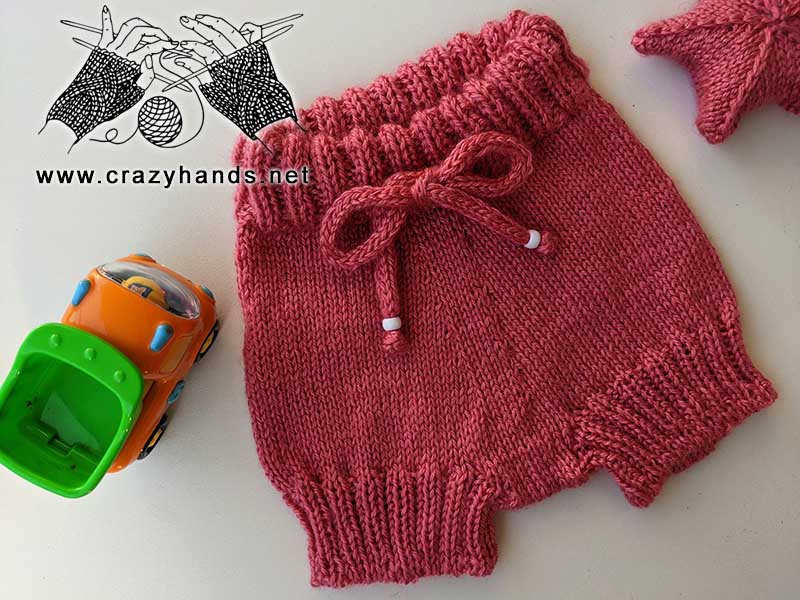
Knit baby diaper cover measurements:
| Age | 3 months |
| Height, cm | 62 |
| Bottom height (w/o waist ribbing) | 14 |
| Waist circumference | 44 |
| Yarn, grams | 35 |
*All measurements are in centimeters if not mentioned otherwise.
Gauge: 20 -21 stitches = 10 cm (4 in)
1 cm = 2 sts
Calculations for 3 months baby diaper cover:
Waist circumference 44 cm * 2 sts = 88 sts. Round the number if needed to make it a multiple of 4.
Baby diaper cover knitting pattern:
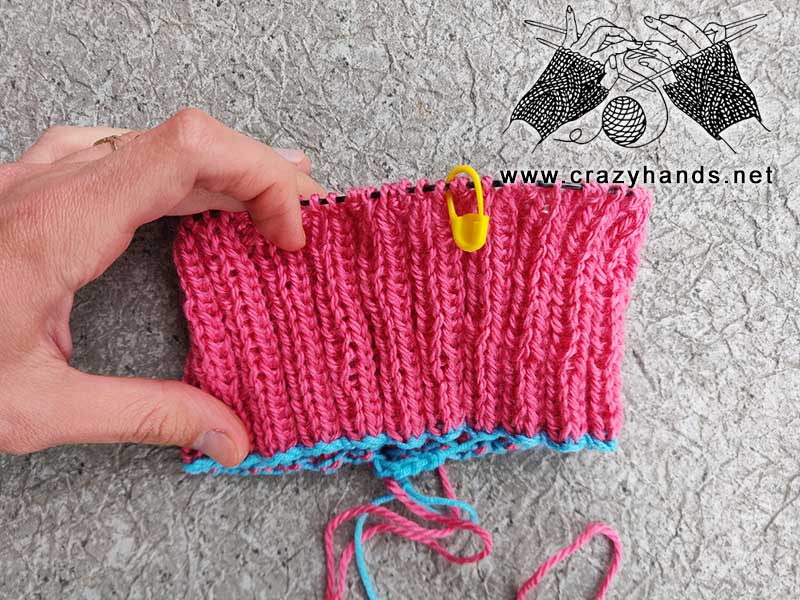
To get started with the baby diaper cover we are going to use the provisional cast-on method. Using hook and smooth piece of scrap yarn (preferably in a different color, so that you can identify it easily later), chain 95 (or another number that will be bigger than the required number of stitches). Take 3.5 mm knitting needles and pick up 88 stitches through the “bumps” on the back of the chain. Count your stitches when you are done. Pm and join to knit in the round.
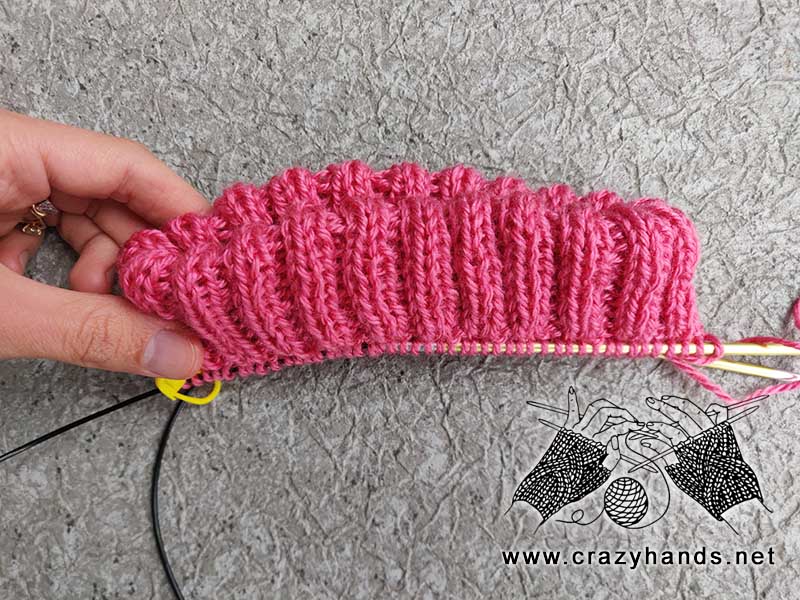
Rib k2, p2 until waist part reaches 8-9 cm.
Unravel provisional cast-on and get live stitches back onto the needle (take an additional pair of knitting needles). Fold the piece in half, line up all stitches and knit the first stitch you picked up (back needle) together with the first stitch on your needle (front needle) as a k2tog. Continue knitting together live stitches from both needles.
When the waist ribbing is done go on knitting the main diaper cover part. With the help of short rows, we are going to make the back part of diaper cover longer. Babies have rounded bottoms, and using short rows allows for a customized fit that accommodates the natural curves of their bodies. By adding extra length to the back of the diaper cover, you ensure that it covers the baby’s bottom adequately and provides a good fit.
Use these simple calculations to place stitch markers.
88 sts /2 = 44 sts
44sts / 3 = 15+14+15 – divide as equally as possible.
14 sts for the central part
15 sts for each of the right and left parts of the back.
15 sts / 4 = 3 + 4 + 4 + 4
Look at the picture to understand what we have just done.
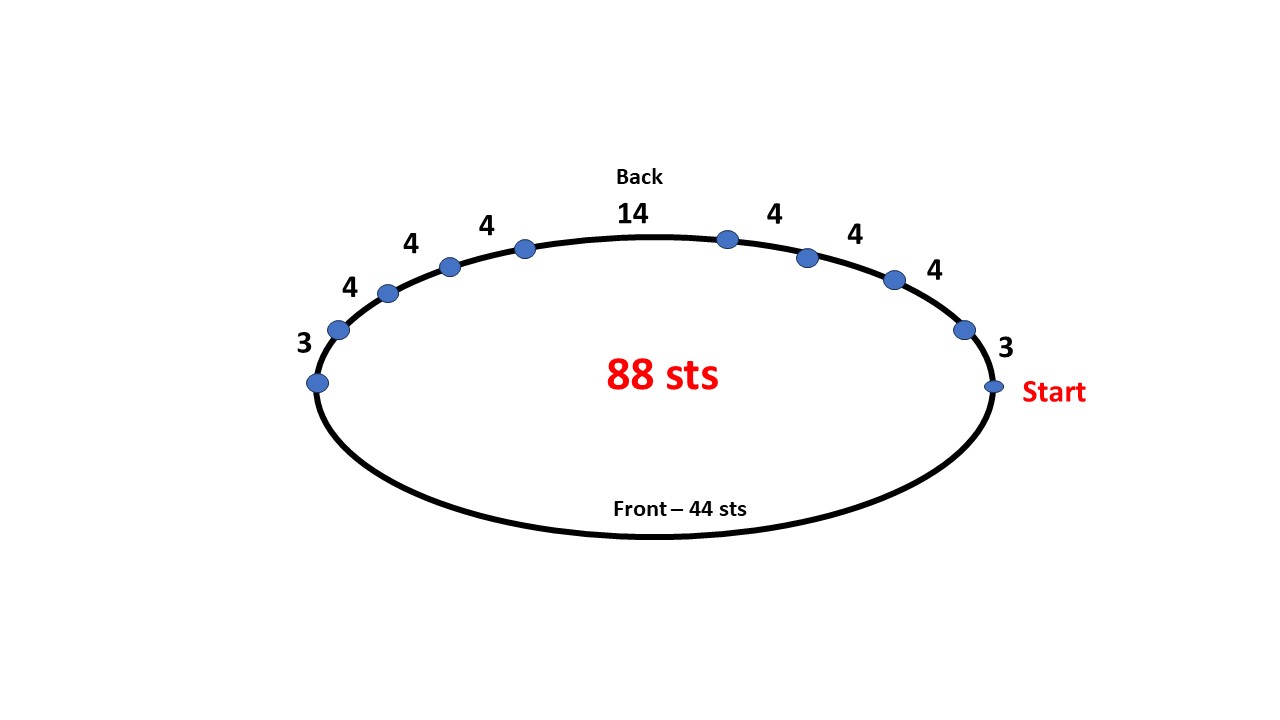
Place stitch markers as follows:
Count 44 sts, pm, 3 sts, pm, 4 sts, pm, 4 sts, pm, 4 sts, pm, 14 sts, pm, 4 sts, pm, 4 sts, pm, 4 sts, pm, 3 sts, pm.
Row 1 (RS): k44 (front part), pm, k28, slip next stitch holding the working yarn in front, after that move the yarn in back and turn the work so the wrong side is facing.
Row 2 (WS): Now the working yarn is in front, slip the same st back. It looks like you wrapped the slipped stitch. P12, slip the next stitch holding the working yarn in front, after that move the yarn in back and turn the work so the right side is facing.
Row 3 (RS): When the working yarn is in front, slip the same stitch back and after bring the yarn to the back. K12, find the wrap and the wrapped stitch, pick up the wrap and place it on the left-hand needle, after that knit it together with the wrapped stitch. Like this, you hide the wrap and get rid off the hole. Also, to make it easier to decrease, before lifting the wrap I turned (twisted) the wrapped stitch and knitted it together with the wrap through the back loop. Remove the stitch marker, k3, and slip the next stitch holding the working yarn in front, after that move the yarn in the back and turn the work so the wrong side is facing.
Row 4 (WS): Now the working yarn is in front, slip the same st back. P16, find wrap and the wrapped stitch pick up the wrap (it is better to pick up the wrap on the right side), place it on the left-hand needle, then purl it together with the wrapped stitch. Remove stitch marker, p3, slip next stitch holding working yarn in front, after that move the yarn in back and turn the work so the right side is facing.
Row 5 (RS): When the working yarn is in front, slip the same stitch back and after bring the yarn to the back. K20, find wrap and the wrapped stitch, pick up the wrap and place it on the left-hand needle, after that knit it together with the wrapped stitch. Remove stitch marker, k3, slip next stitch holding working yarn in front, after that move the yarn in back and turn the work so the wrong side is facing.
Row 6 (WS): Now the working yarn is in front, slip the same st back. P24, find wrap and the wrapped stitch pick up the wrap, place it on the left-hand needle, then purl it together with the wrapped stitch. Remove stitch marker, p3, slip next stitch holding working yarn in front, after that move the yarn in back and turn the work so the right side is facing.
Row 7 (RS): When the working yarn is in front, slip the same stitch back and after bring the yarn to the back. K28, find the wrap and the wrapped stitch, pick up the wrap and place it on the left-hand needle, after that knit it together with the wrapped stitch. Remove the stitch marker, k3, and slip the next stitch holding the working yarn in front, after that move the yarn in the back and turn the work so the wrong side is facing.
Row 8 (WS): Now the working yarn is in front, slip the same st back. P32, find the wrap and the wrapped stitch pick up the wrap, place it on the left-hand needle, then purl it together with the wrapped stitch. Remove the stitch marker, p3, and slip the next stitch holding the working yarn in front, after that move the yarn in back and turn the work so the right side is facing.
Row 9 (RS): When the working yarn is in front, slip the same stitch back and after bring the yarn to the back. K36, find the wrap and the wrapped stitch, pick up the wrap and place it on the left-hand needle, after that knit it together with the wrapped stitch. Remove the stitch marker, k2, and slip the next stitch holding the working yarn in front, after that move the yarn in the back and turn the work so the wrong side is facing.
Row 10 (WS): Now the working yarn is in front, slip the same st back. P39, find wrap and the wrapped stitch pick up the wrap, place it on the left-hand needle, then purl it together with the wrapped stitch. Remove stitch marker, p2, slip next stitch holding working yarn in front, after that move the yarn in back and turn the work so the right side is facing.
Row 11 (RS): When the working yarn is in front, slip the same stitch back and after bring the yarn to the back. K42, find the wrap and the wrapped stitch, pick up the wrap and place it on the left-hand needle, after that knit it together with the wrapped stitch.
From this point, we will start knitting in rounds.
Divide again all stitches in half and pm. Now find the central 4 stitches in front and in the back and mark them with a stitch marker.
20 sts, pm, 4 sts, pm, 40 sts, pm, 4 sts, pm, 20 sts, pm.
Round 1: k20, LLI, k4, RLI, k20, find wrap and the wrapped stitch, pick up the wrap and place it on the left-hand needle, after that knit it together with the wrapped stitch, k19, LLI, k4, RLI, k20. (92 sts)
Rounds 2-4: knit all stitches.
Round 5: k21, LLI, k4, RLI, k42, LLI, k4, RLI, k21. (96 sts)
Rounds 6-8: knit all stitches.
Repeat the last four Rounds until the diaper cover measures 14 cm (Check measurements for Bottom height (w/o waist ribbing). I have completed a total of 8 rounds with increases, resulting in a total of 120 stitches.
Knitting gusset of the diaper cover:
take a ruler and measure 6-7 cm in the center of the front. Find out how many stitches and mark them with stitch markers. Repeat for the back part. In my case it is 14 sts.
Row 1: k23, gusset: k13, p1, turn.
Row 2: slip 1st st, p13, turn.
Row 3: skpo, k10, skpo, turn.
Row 4: slip 1st st, purl all sts, turn.
Row 5: skpo, k8, skpo, turn.
Row 6: slip 1st st, purl all sts, turn.
Row 7: slip 1st st, k9, turn.
Row 8: slip 1st st, p9, turn.
The gusset should measure now about 3 cm. Repeat the last 2 rows if the length is less. Cut the yarn. Slip 10 gusset stitches into the stitch holder or scrap yarn. In the same way, slip all stitches of the left leg (46 sts) until the next stitch marker.
Attach yarn and repeat Rows 1-8 once more. Cut the yarn leaving 25-30 cm tail.
Place 10 stitches of the front part back into the needle and graft open stitches of the gusset together using the Kitchener stitch.
Change to smaller knitting needles.
Knitting the right leg of diaper cover:
pick up stitches along the gusset, k46. The final number of stitches must be a multiple of 4. Adjust the stitch count in the following round either by decreasing or increasing stitches.
Rounds 1-10: [k2, p2] – repeat around.
Round 11: [k1, C1F, p1] – repeat around.
Round 12: [slip next stitch holding the working yarn in back, p1] – repeat around.
Round 13: [k1, slip next stitch holding the working yarn in front] – repeat around.
Bind off all stitches. Use any cast-off technique you know. I recommend Tubular Cast Off. Cut the yarn, leaving 3-4 times the length to be cast off and threaded onto the yarn needle. Place stitch markers into 1st and 2nd stitches. It will later help us to finish the tubular cast-off.
-
- Insert the yarn needle into the first stitch (knit st) knitwise, pull the yarn through and drop it off the needle.
- Skip the next purl stitch and insert the yarn needle purlwise into the next knit stitch. Pull the yarn through.
- Insert yarn needle into new first stitch (purl st) purlwise, pull the yarn through and drop it off the needle.
- Insert yarn needle from back to front between new first and second stitches and right away insert yarn needle into second stitch (purl st) knitwise. Pull the yarn through.
- Repeat steps 1-4 around. For more instructions check the video tutorial.
Knitting the left leg of diaper cover:
Repeat for the left leg. Weave in all ends.
1 comment
This diaper pattern looks good